
 |
| An Iraqi irrigation canal. |
To read it now, this it sounds like it was adventurous and exhilarating. Trust me though; it was mostly dirty, sweaty and boring. Anyway, at the particular time of year we were there most of the canals in the area were dry and were essentially empty trenches out in the farmland. A lot of them were fairly deep and from time to time we used them to change location out of sight of locals who would have reported our presence to the people upon whom we were trying to sneak up (i.e. the bad guys).
 |
| Moving in and around Iraqi irrigation canals. |
One day as I sat in the bottom of one of these canals as I looked up several of our guys jumped over the trench from one side to another. Hmmm… “Now that would make a cool diorama.” I thought; troops (and maybe a vehicle) crossing over a trench with enemy troops still down inside a position that was being overrun. I took out the little green notebook that I always carried with me and jotted down a sketch for future reference.
 |
| The original sketch done on my notebook in an irrigation ditch in Iraq. It smelled of feces and there were flies everywhere. |
Fast forward a few years and I am finally getting around
to trying the idea out. As I searched my
stash of kits and figures for suitable subjects the scene eventually took shape
in the form of Imperial Japanese soldiers overrunning a British trench in
Malaya or some similar location early in the war when things weren’t going all that well for the Allies.
 |
| This still from a Japanese newsreel helped me firm up the trench idea. |
 |
| This wartime poster was another inspiration for the diorama, at least the title - 撃ちてし止まむ!(Shoot and don't stop!) |
The Figures
This
was an ambitious undertaking for me since I’m not what one would call and
“expert” figure painter. The figures are
the real focus of the scene so this diorama was going to require more than just
a simple tank commander sticking his head halfway out of a tank cupola like I
normally do.
I was going to need at least three or four charging
Japanese soldiers. I found just what I
needed in the Master Box “Bloody Atoll” figure series.


Figures tend to look most convincing when they are at the
extremes of ranges of motion. They rarely come out of the box this way so sometimes a little cutting and
repositioning of the limbs is necessary to put them in a convincing pose. It helps to
have live examples to reference when performing corrective surgery to the stock pose.


I took the figure which out of the box was simply
standing with a very wide fighting stance and by extending his leg and bending
his knees was able to make look like he was landing after a big jump.


I also used one kneeling figure from the very, very, very, very, very old Tamiya Japanese Army Infantry set. For all its age this is actually one of the better sets of Japanese soldiers. The detail is not on the same level as the newer figure sets but the poses are very natural looking and convincing.


I painted the figures with a combination of Valejo
acrylics and oils. The final step in
painting the figures was to blend them into the base weathering with pastels.

The straps are made from sheet lead and the flag is a
sheet of Apoxie Sculpt rolled very thin and trimmed to size.
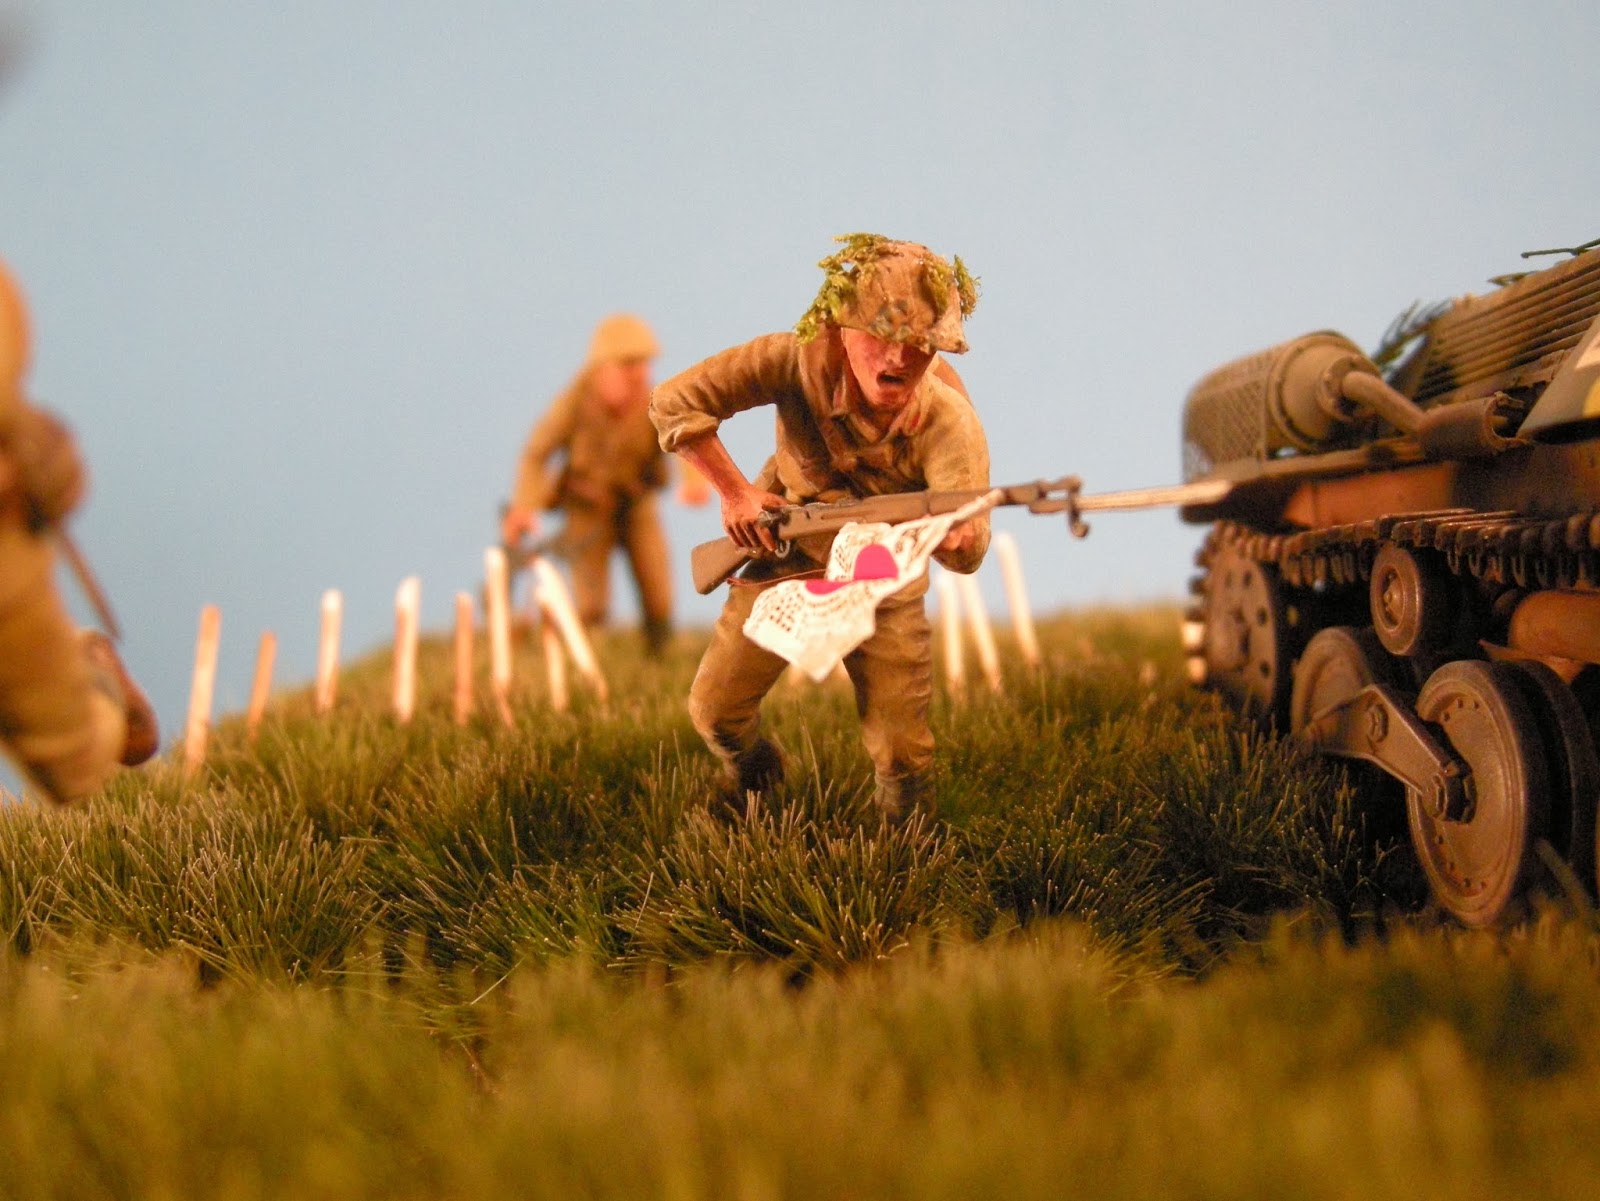
I used a decal for the flag from Kit number 1 in the
Master Box Imperial Japanese Marines figure set. I rolled out a ball of Apoxie Sculpt putty
paper thin and trimmed it to the proper size for the flag. Once it was dry I set the flag decal in place
and slathered it with Micro Sol. The
flag decal was very thick and brittle. I
actually had to use super thin cyano glue to get it to finally adhere to the
Apoxie Sculpt at one of the corners where it stubbornly kept curling up. Once done though I think it adds a nice
splash of color to the scene.


The
Tank
I chose the Fine Molds Type 95 Ha Go for several reasons. First, it was Japanese and appropriate for the scene. Second, I had one in my stash already and it’s a pretty good kit. It builds up nicely right out of the box with minimal fuss. Third, since my shelf space is limited I wanted to keep the footprint of the diorama small. The Type 95 will literally fit in the palm of one’s hand so it filled that bill.
I chose the Fine Molds Type 95 Ha Go for several reasons. First, it was Japanese and appropriate for the scene. Second, I had one in my stash already and it’s a pretty good kit. It builds up nicely right out of the box with minimal fuss. Third, since my shelf space is limited I wanted to keep the footprint of the diorama small. The Type 95 will literally fit in the palm of one’s hand so it filled that bill.

Since I was already intending to spend a lot of time and
effort on the rest of the scene, I intended to build this kit right out of the
box. The Fine Molds Type 95 is a fairly
old kit (it was first issued in the 1990’s) and isn’t without problems but is
still a fine kit. This version comes
with a small photo etch fret and some nice white metal pieces as well. The only problem is the tracks. They are the rubber band type and which
detracts considerably from the kit when it’s all put together. I opted for a set of Model Kasten individual
link tracks which cost more than the model itself, but were well worth the
price. They are able to show the proper
track sag and they have excellent detail.

It went together with only a few fit issues, the most
prominent being where the fenders meet the final drive housing in the
front. This was fixed with some sheet
styrene with minimal fuss.

The housing on the 37mm main gun barrel was also a bit of
a problem. It had some fit issues and
sink marks which required a general rebuild.
After fixing this some rivets needed to be replaced using a sub-micro
punch and die set.

I used custom mixed colors on this project. Japanese tanks during this time period and
theater were usually painted with a combination of three colors; 枯草色 (karekusairo) or
Parched Grass (a greenish khaki), 草色
(kusairo) or Grass Green (a medium green) and 土地色 (tochiiro) or Earth
(a medium somewhat reddish brown). I mixed these using Tamiya acrylics. The base color for Parched Grass was XF-49
Khaki. Grass Green was XF-58 Olive Green
and Earth was XF-64 Red Brown. I added
various colors to get the exact shade I wanted.
I kept no record of what I mixed and in what ratio.

I masked the camouflage pattern with yellow Tamiya tape. The pattern was fairly complicated and the many rivets and irregular surfaced didn’t help any.

The decals are those supplied with the kit. The only surface preparation I used was to
buff the area where the decal was to be applied lightly with a shop wipe to
smooth the surface slightly. The decals
all nestled down nicely with liberal applications of Micro Sol.

I painted the tracks with a mixture of XF-1 Flat Black
and XF-56 Metallic Grey, then dry brushed the face of each link with straight
Metallic Grey.
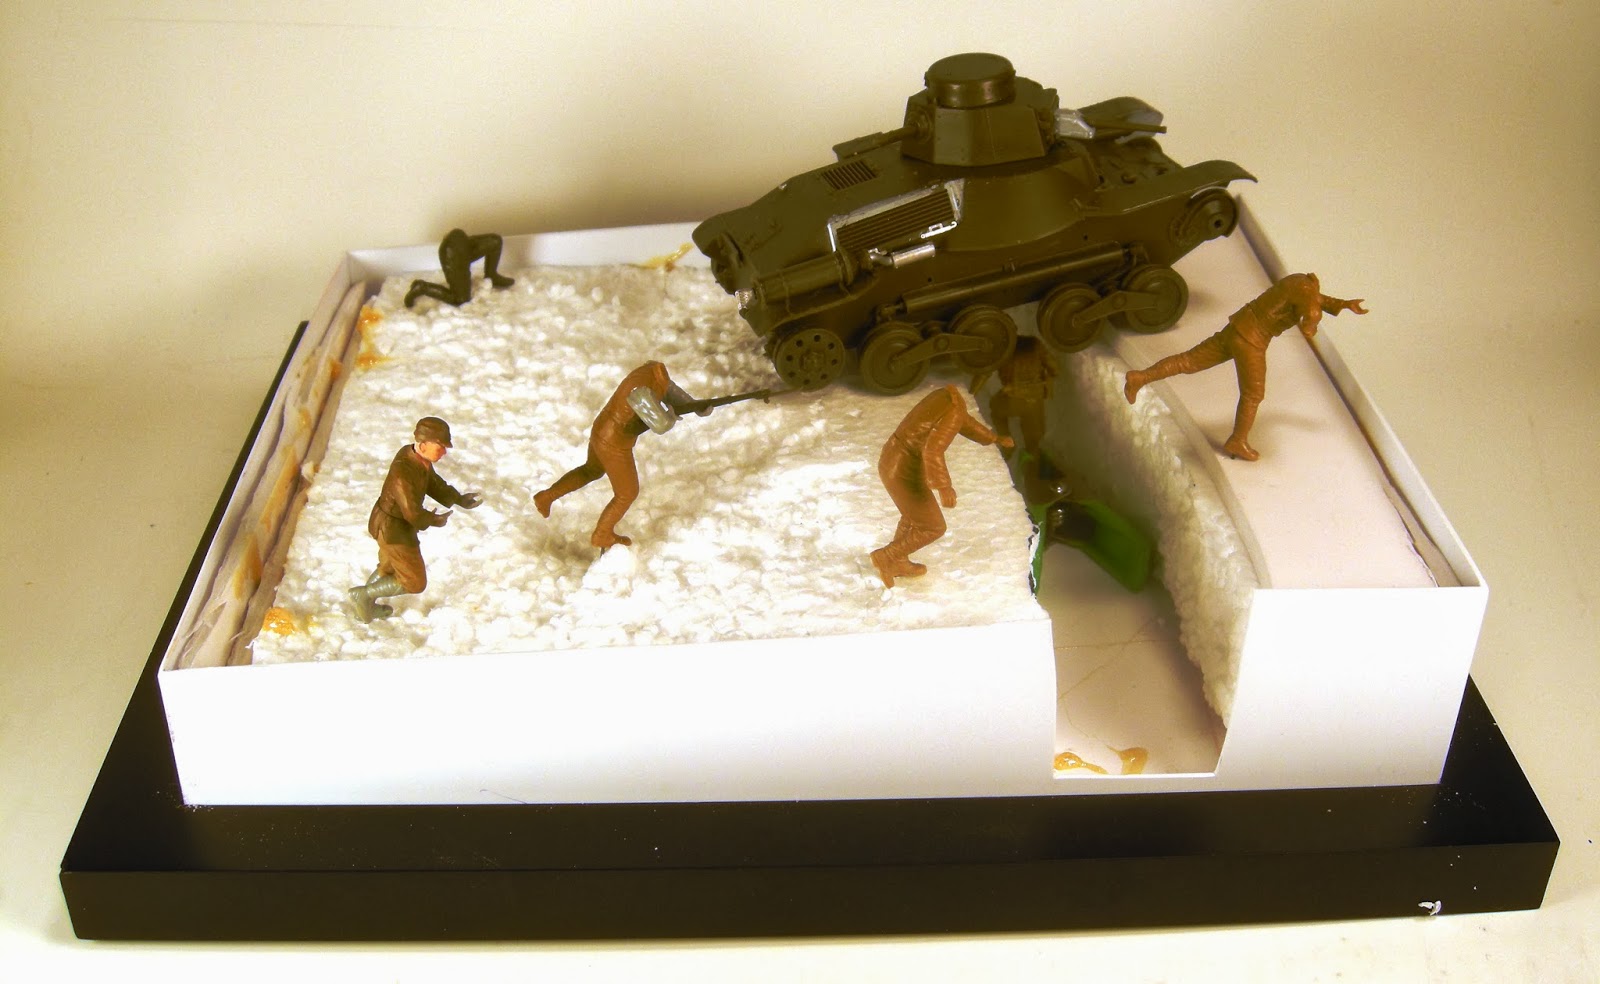
The Base
Throughout the process of building the figures and vehicle I build up the base and fit each piece in place as it developed. The composition of the diorama is always the most important part so I wanted to make sure each part fit together and complemented one another. This required frequent posing and reposing of vehicle, figures and adjusting the terrain as needed.

The base itself is a Walmart picture frame. I sketched out where the major components
were supposed to go and built up a containing wall of Evergreen sheet
styrene. The filler for the terrain was
made from Styrofoam insulation. I made
sure to trim the Styrofoam so that there was room for the groundwork material
to fit without oozing over the sides when it was applied.
Once it was in place and trimmed I covered the Styrofoam
with Elmer’s Wood Putty. This has become
my favorite material for groundwork. It
adheres well to almost any surface, dries relatively quickly, does not shrink
when it dries and cleans up with water.

Since the scene was supposed to be in somewhere in Southeast
Asia and I didn’t plan on constructing any major vegetation , I reasoned that
tall grass would be an appropriate ground cover. I’ve always had real trouble getting long
static grass to look convincing though.
I’ve even tried the vaunted (and outrageously expensive) Noch “Static
Master” applicator to no avail. I’ve
used commercially produced tufts with good success but I had a pretty large
area to cover. Using store bought tufts
would make it a pretty expensive undertaking.


The resulting grass was very stiff so I left some empty
spots so the tank would sit “in” the grass and not “on” the grass.

I painted the
grassy areas varying shades of olive and green and followed this with dry brushing
of successively lighter shades of beige and yellow. I did the final dry brush with XF-4 Yellow
Green. I used various
shades of flat brown on the bare dirt trench and followed this with a glaze of
Future floor polish to make it seem wet and “muddy”.

I wanted there to be some sort of barrier in front of the trench. I first considered using barbed wire, but that would have necessitated some sort of action by the Japanese soldiers to breach the obstacle. This, I felt, would have detracted from the speed I wanted to convey by having the figures quickly overrunning the position. Then I found a reference that described the heavy use of punji sticks by the British during their retreat down the Malay Peninsula. This would be perfect I thought, but no material I tried (plastic tubing, rolled paper, copper tubing, yada, yada, yada…) looked anything like real bamboo.

Luck smiles on
the persistent and the obsessed however.
One day while parking my car in a shopping center parking lot I happened
to notice tall stalks of ornamental grass planted by the curbing. Hmmm.
It was dry and parched in its dormant winter state and was the exact
color of bamboo stalks. I picked some
and the stalks were the perfect diameter and texture. The only thing that was lacking was the
ridges formed by the joints you find on real bamboo. Oh well.
I guess we can’t have everything.
Still, when placed in the grass and on the trench floor they couldn’t
have looked better.

The items on
the trench floor are wood boxes from GC Laser’s line of excellent
products. Actually, it’s just one
box. I didn’t have one that fit in the
trench so I cut one half which was too big, put compo ration markings from
Archer Fine Transfers on each end and covered the other with a tarp made from
tissue hardened with diluted white glue.
The other items are mostly from the spares box. The spent cartridge casings are stretched
sprue painted copper and glued in place.

The final touch was the bit
of vegetation in the form of palm fronds, ferns and various leaves used as camouflage on the tank. These are the paper jungle vegetation from
J’s Work excellent line of paper products.
I repainted them so that they matched the grass I had set earlier and
fixed them to the buttoned up tank with white glue, taking care to not obscure
any of the vision ports on the tank.


DAMN NICE, MAN!
ReplyDeleteThis really is a work of love and very inspiring for me. You are a true artist! I'm a prof. modeler myself and your work makes me feel like a beginner all over again....LOL
I bookmarked your page and will visit very so often because I'm a big fan of Japanese military kits,and your work only makes me want to get more ;)