
Every other year my local IPMS chapter hosts a fairly large scale regional contest. It’s loads of fun and I usually take whatever I’ve built over the past year or so to enter. This coming year some of the members decided to create a new category; Vintage Kits. The rules are that any kit in this category had to be originally issued in the year 1980 or earlier. This got me pretty excited since I have a weakness for the kits I built as a kid.
I like to collect vintage kits. As I took mental inventory of the old Revell,
Monogram and Tamiya kits I had sitting unbuilt in my stash I remembered I had
several kits that I had built when I was about 15 years old which had against all odds survived the ravages of time
and were collecting dust in a box in my garage.
Why not do a refurbishing project and go…

I hadn’t looked at these models
since I moved out of my parent’s house at the tender age of 18 many decades
ago. I remember thinking I was a pretty
accomplished modeler back then. When I
dug them out of the box I realized how much I had been deluding myself. They were pretty, well, awful.


 |
| What do you mean I'm not as awesome as I thought I was?!?!?!?!?! |

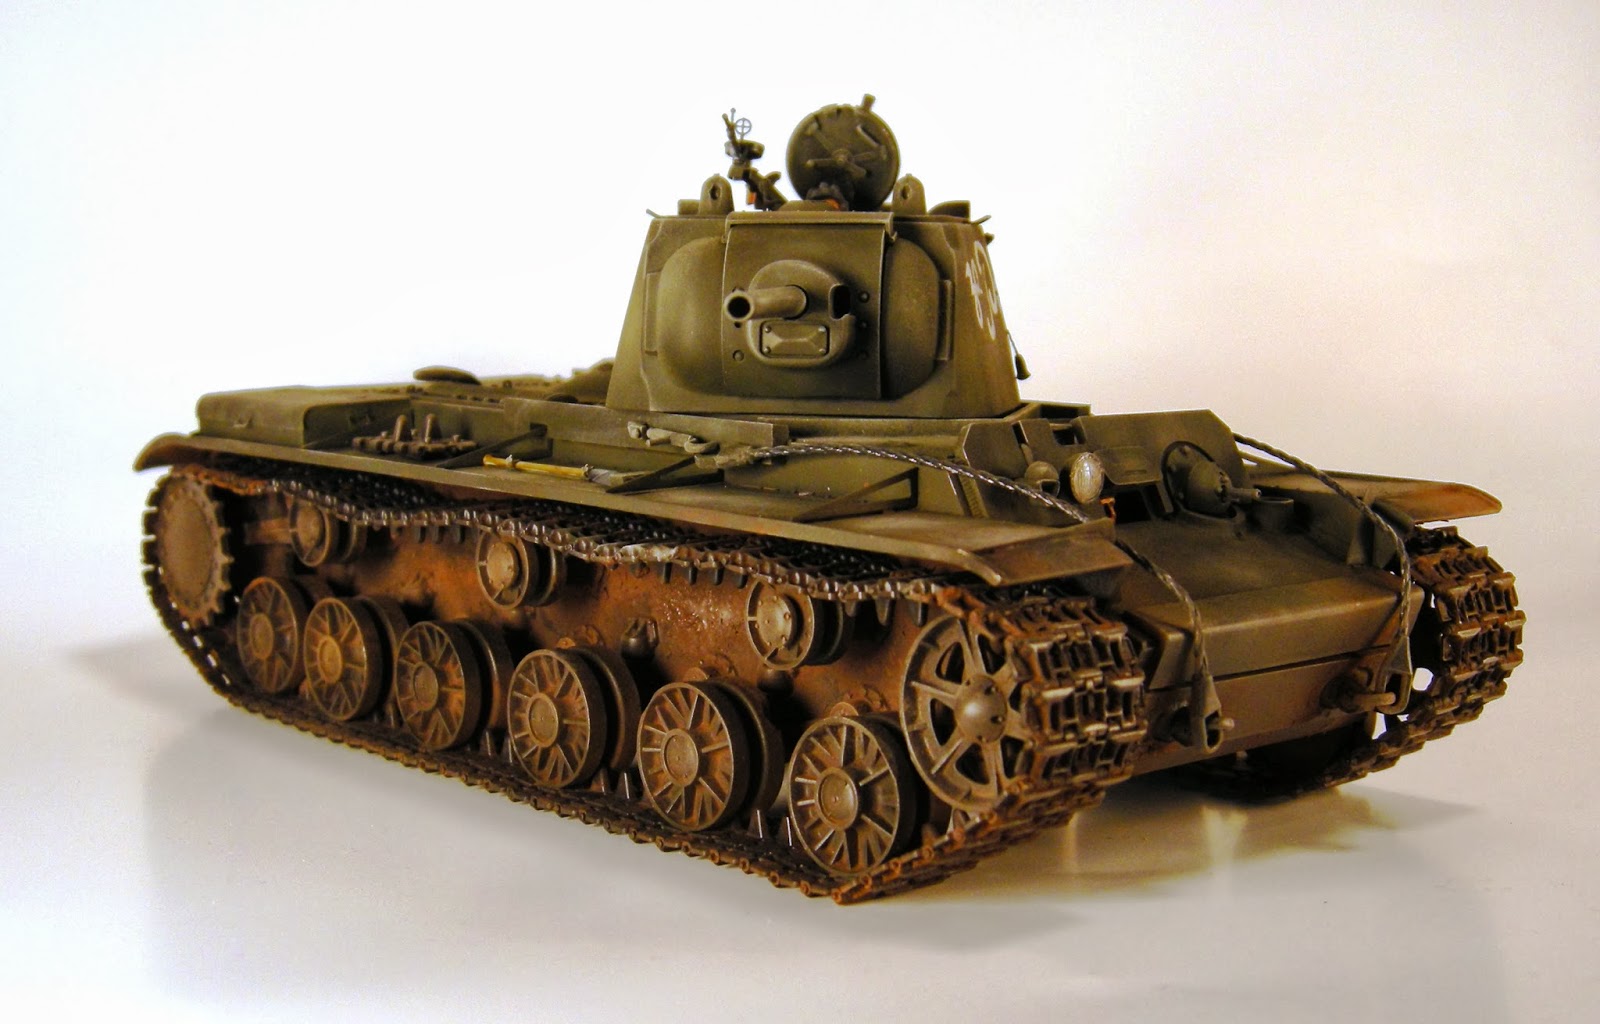
I decided I would also upgrade the kit with an Eduard photoetch set and the Bronco 650mm Omsh Track-Link set.


The Kit
The Tamiya KV-1 kit is quite good for its age and has withstood the test of time fairly well. It has been reissued several times over the years and while to the best of my knowledge it is not currently in production, it is still readily available in secondary markets.

The kit has generally accurate dimensions and the rivet detail is correct for the cast turret Model 1941 version of the KV-1 that the kit intends to depict but there are some details that are more correct for later KV-1s.
 |
| The KV-1 formerly located at the Army Ordinance Museum, Aberdeen MD. |
 |
| The KV-1 at the Bovington Tank Museum, UK. |
This really doesn’t present a problem however since it was fairly common for KV-1s to sport a mish-mash of early and late features. Tamiya engineers seem to have based this kit on either the surviving KV-1 at Aberdeen or the one at Bovington since the details of both are very similar to this kit. There is some molded on detail that needs to be removed such as the radiator intake screens and the engine access hatch locking hook.

The one piece vinyl tracks suffer from only one problem: they are one piece vinyl tracks. They lack detail on the inner surfaces and are all but impossible to position depicting proper track sag. They are also incorrectly proportioned with too many links on each track run.
 |
| Friends don't let friends use vinyl tracks. |
 |
| Ahh, that's better. |
This causes the drive sprocket to have too many teeth. This posed a real problem when I tried to mount the correctly proportioned Bronco tracks on the model since it caused the tracks to sit on top of the teeth instead of meshing with them. I’ve run into similar problems before on poorly designed kits and one simple remedy is to just clip off the teeth where the sprocket comes in contact with the track. This works well on smaller scale kits but it’s dodgy on 1/35 scale and especially on a large tank like a KV-1 where the missing sprocket teeth would be noticeable to any sharp eyed observer. I ended up having to carefully shave all of the teeth off the sprockets and repositioning them in the correct spots. It was tedious but paid off in the end.

The kit hull is a tub type with the floor and three sides cast in one piece. The torsion bar arms, return roller arms and idler adjustment tackle are integrally molded into the hull as well. These features lack the detail and definition you find on newer production kits like the Trumpeter KV-1s. When all is said and done however, missing details like the grease caps on the torsion bar arms are very difficult to notice to anyone but the most obsessive rivet counters when the running gear is fully assembled.


There are large holes to accommodate the gearbox and other motorization paraphernalia. Since this kit was already built I left the gearbox in place and only covered the holes that would be visible when the model was sitting on a table display. Apparently when I built the kit back in the 1970’s I used copious amounts of epoxy to cement the thing in place. So, I took the coward’s way out and left it in place since prying it out would have been a major undertaking.

The upper deck is a one piece affair
with very few bits and bobs to add. The
details are generally correct, if somewhat simplified and molded in place. The Eduard photo etch bits do a lot to enhance
the kit here. The fender brackets are
integrally molded onto the upper deck and need to be shaved off and replace
with PE parts. There are also lifting
eyes and tool brackets in the PE set which add a lot to the level of detail.

The radiator air intake screens are
molded into the upper deck and needed to be cut out and replaced. The photo etch parts allow one to see inside
the empty hull however so I placed some sheet styrene behind the new opening
and painted it black.


The exhausts presented a small problem in that they were solid and flat across the back where there should have been an opening. I couldn’t find and aftermarket solution so I took some .040” x .060” styrene strips and glued them across the edges of where the opening should have been. Once this was good and dry I coated the outside with a liberal slathering of Tamiya grey putty. Once this was completely dry I was able to sand down the rough edges and get the exhaust back to the proper oval shape.

The driver’s visor on the front
glacis can be posed open but needed something behind it. I reasoned that the driver’s face is what one
would see if the visor were flipped up so I placed one of the figures that came
with the kit in place there.

This was a little tricky since it
needed to be put in place after the tank was assembled and painted. To make this easier I glued some styrene
guides in place on the hull floor so I could place the figure torso more easily
after the upper deck was glued in place.

The fenders are molded on the upper
deck. When I originally built the kit
back in the olden days I tried the old “melt the fender with a candle to make
it look bent” trick with disappointing results (well, I’m sure I thought it
looked good back then). I was able to
straighten out all of the fenders except the right rear one. This I had to cut out and take a replacement
piece from the unbuilt donor kit.

The kit has correctly proportioned armored
hoods for periscopes in the driver’s position as well as on the turret. They are large however and look very empty
without actual periscopes inside. I used
some clear styrene to fill the spaces creating a convincing periscope in the
armored hoods.

I pirated several stowage boxes from
the donor kit. There are both long
rectangular boxes and curved lid larger boxes.
These boxes are the correct shape and size but are very simplified and
lack any mounting brackets, latches or handles.
Again, the Eduard PE set provided these details.

The kit also provided two external
fuel tanks. I’m not an expert on KV
tanks but all of the photographic evidence I have seen points to these not
being common until at least 1943. Since
I was building this kit as an earlier model I left the fuel tanks off and
removed the mounting pins.
 |
| This is where the kit instructions call for you to mount the external fuel tanks. I rigged spare tracks and pioneering tools there instead since that was more appropriate for an early to mid KV-1. |

The cast turret is very well done
and has excellent dimensions. It lacks
the rough cast texture found on Soviet tanks however. This was easily fixed with an application of
Tamiya grey putty. I stippled it on with
a stiff brush then sanded it lightly after it was dry. The turret pistol ports are molded in
place. As I was sanding the cast texture
on the turret inadvertently sanded off one of the pistol port plugs. Instead of building it back up I just drilled
it out and fashioned a plug out of styrene and posed it in the open position.

The turret hatch ring has a simplified mount for an anti-aircraft machine gun. I detailed this mount with PE parts from the Eduard set and some creative gizmology from the spares bin. The DP machine gun is from a Master Box Russian Infantry set. The AA sights on the machine gun are from spares from a 1/48 scale Japanese aircraft PE set.

The bow machine gun and rear turret
machine gun mounts are well done but benefitted from new machine gun
barrels. I used a length of .030” brass
tubing for the barrels.

Refurbishing
With 20/20 hindsight I realize that it would have been much easier to just build the donor kit from the ground up instead of fixing all the mistakes I made as a 15 year old kid. This model is from the time when models were as much toys as they were “don’t touch” detailed replicas. This tank had been played with, put in at least three different dioramas and painted at least four different times (green, white, brown and then green again) with different paint schemes.
With 20/20 hindsight I realize that it would have been much easier to just build the donor kit from the ground up instead of fixing all the mistakes I made as a 15 year old kid. This model is from the time when models were as much toys as they were “don’t touch” detailed replicas. This tank had been played with, put in at least three different dioramas and painted at least four different times (green, white, brown and then green again) with different paint schemes.


 |
| Finger prints left my me as a teenager. |
That being said, it
was a little surreal to sand away layers of hobby paint and find fingerprints
in the dried paint that belonged to me from when I was a teenager over
30 years ago. It was kind of like exploring
an ancient Egyptian tomb and discovering that you are the mummy!

I can be a sentimental old cuss at
times and I had pretty happy childhood.
It tugged my heart strings a lot to grasp that this model had actually been
on my desk in my room upstairs in my parent’s house over 30 years ago. It was a little bit like time travel back to
a very happy time for me.

Once the model was stripped and
upgraded with the photo etch parts it was ready to paint. I usually don’t prime models. I don’t like to add any layers that could
obscure detail, even if it is a small amount.
With all the photo etch parts and stripping I had done on this kit I
decided to use primer on this kit. I
used Vallejo black airbrush primer which goes on smooth as silk. For the Soviet Green I used Tamiya XF-58
Olive green mixed with XF-13 Japanese Army Green as the base coat. I followed with the same paint heavily
thinned and lightened with XF-57 Buff to highlight and post-shade.
 |
| The refurbished kit with the base coat and preshading done. |
Once this was done I painted the
only markings found on the tank; a patriotic slogan on the turret side (Za Rodinu-“For the
Motherland”) . I did this by hand with Vallejo 004 Off White using a period
photo as a guide. Patience is a virtue I
don’t always possess and I messed up several times and had to respray the
turret side green and start over.

The eyelets on the tow cable ends
are from the kit but the cable itself is braided wire from the spares bin. I cut the ends from the molded styrene cables
and glued them to the braided wire with CA glue.
Once all the basic painting, post shading and detailing
was done I applied a series of washes consisting of black, khaki and umber
artist oils mixed with Liquin to enhance the flow.

I used ground pastel chalk mixed with a very thinned
amount of Liquetex silicone gel on the lower hull and tracks to build up
accumulated road debris in the running gear area. I sealed it in with a light coat of Future
which had the added benefit of giving the mud a slightly shiny damp look. If I had wanted it to look like really wet
new mud all I would have had to do was apply more Future. For my purposes here a damp look was good
enough though. I followed this with a
metallic grey artist pencil on the protruding and friction areas of the tracks
and steel road wheels to show wear.
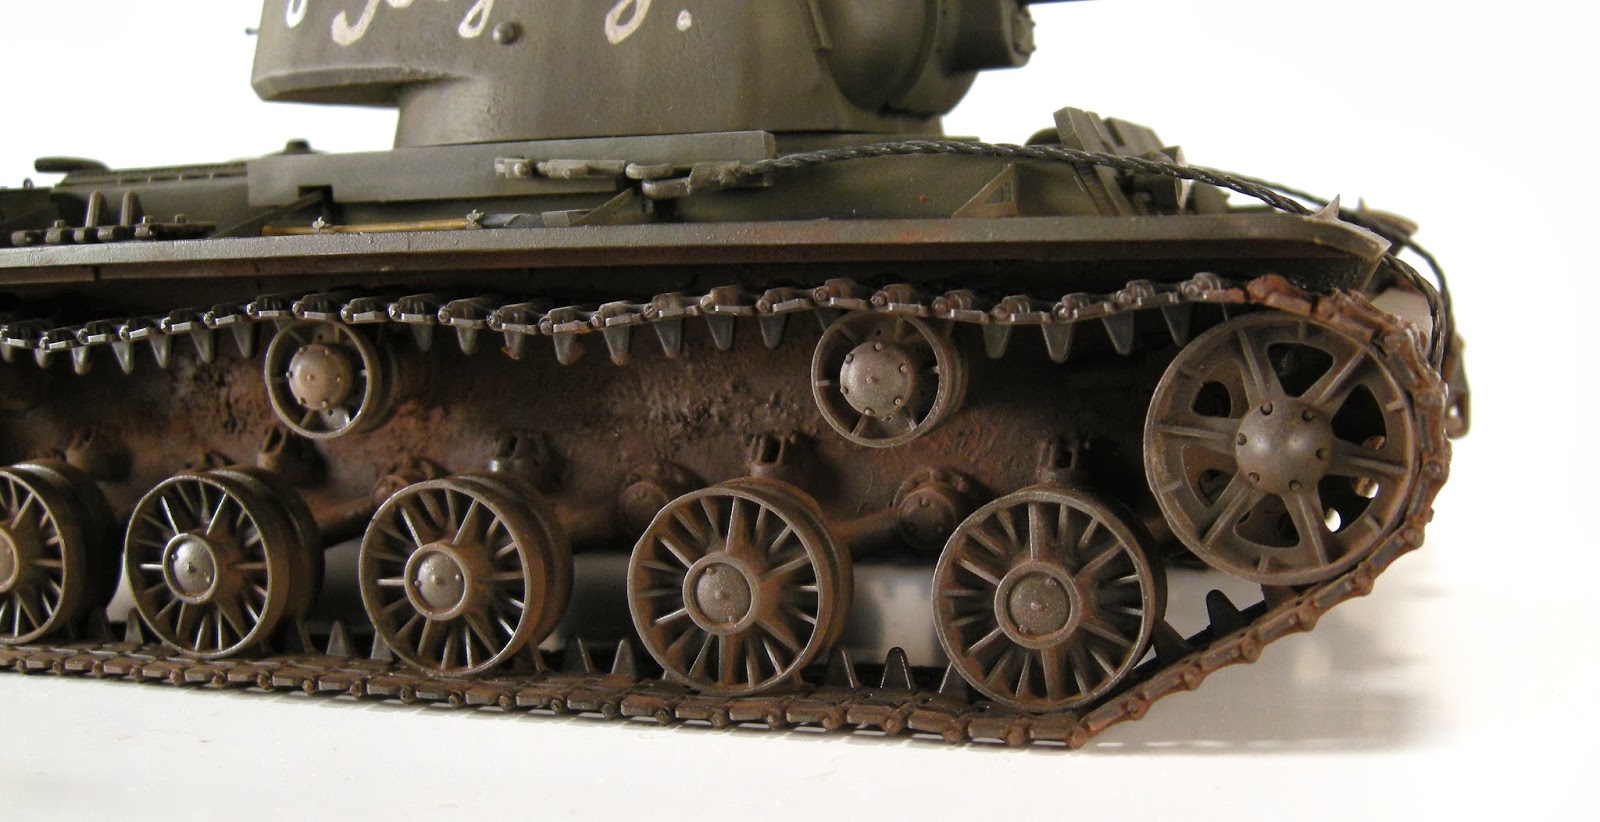
After letting all of the washes and pastel chalk dry for
a day or so I followed up with a wash of black artist oils on the lower hull
and running gear to give it a nice 3D effect.
Then I applied a very light drybrush with buff pastel chalk. The rivets and other detail really popped
with the drybrush.

Conclusion
So there it is. Refurbishing a kit is not for the faint of heart. It is much easier to start with a virgin kit than to undo mistakes that have already been made. Plus, it definitely helps to have an unbuilt parts donor kit on hand to supply unfix-able parts. All that being said however, I think I enjoyed this project more than any kit I’ve built in at least the last ten years. It really took me back to a very happy time in my life to handle this kit. If anyone reading this has an old kit from yesteryear like this in their collection I heartily recommend giving it a try. It teaches you a lot about where your skills have gone in over the years as well as how modeling technology has changed.
So there it is. Refurbishing a kit is not for the faint of heart. It is much easier to start with a virgin kit than to undo mistakes that have already been made. Plus, it definitely helps to have an unbuilt parts donor kit on hand to supply unfix-able parts. All that being said however, I think I enjoyed this project more than any kit I’ve built in at least the last ten years. It really took me back to a very happy time in my life to handle this kit. If anyone reading this has an old kit from yesteryear like this in their collection I heartily recommend giving it a try. It teaches you a lot about where your skills have gone in over the years as well as how modeling technology has changed.
