One of the big kicks I get out of modeling these days is purchasing old kits I remember building as a kid and experiencing them again. It's a fun way to relive a great childhood. I built dioramas as a kid too and anyone about my age remembers the "Tips on Building Dioramas" sheets that came with some of the Monogram kits back in the 1970's. These sheets contained text and photographs of works done by master modeler Sheperd Paine. They were were
inspiring to me as a young modeler and showed me what was possible with the very kit I had just purchased. Even though I was never remotely successful
in approaching the level of expertise depicted in the tip sheets, they
encouraged me to stretch my then developing skills and try things I never would
have thought of otherwise.
One of my favorite tips sheets was a small abbreviated
one that depicted a Sturmgeschütz IV
using a partially destroyed building as cover. It was a simple scene but the way the ruins
framed the assault gun always intrigued me.
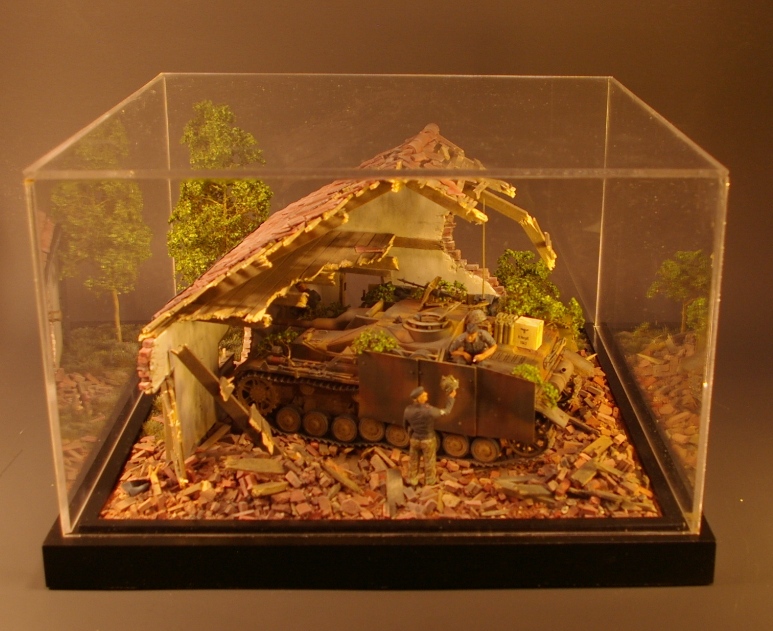
I tried to replicate this diorama as a kid but my finished product only slightly resembled the photos contained on the tips sheet. I figured now was as good a time as any to try it again. This is my take on this classic
diorama by master modeler Shep Paine.
 |
| Mr. Paine's diorama |
 |
| My diorama |
Besides a kit that and figures that would be considered crude by
today’s standards, Mr. Pain had to deal with an impossible deadline to complete the job and was
restricted to using only Monogram products.
I on the other hand was able to use a kit made with state of the art
molding technology, photo etch parts, resin aftermarket parts and figures that
needed only slight modification to put into the poses I needed.
 |
| My diorama |
 |
| Mr. Paine's diorama |
The original diorama depicted a vehicle from the Großdeutschland Panzergrenadier
Division which only served on the Eastern Front. Somehow I always had it in my mind that the scene should be set in Italy or France though so I opted to depict a vehicle from
the 17th SS Panzergrenadier Division which used StuG IVs in the
Normandy campaign and later.
The Kit
If I were truly confident in my abilities I would use the same kit that Mr. Paine used in his diorama. Sorry. Not my style. I will always use every advantage at my disposal in any endeavor. Luckily for me, there are kits available today which are generations ahead of what he had to work with. The kit
I chose was the Dragon Sd. Kfz. 167 StuG IV Early Production.
It’s really a very nice kit.
The detail is everything we have come to
expect from Dragon and the engineering is very clever.
It goes together seamlessly.
There is a breech assembly for the main gun inside the
fighting compartment as well as a full set of radios which are all somewhat
visible through the open hatches. There
is more than enough detail in place to leave the hatches posed open without a
figure to hide any empty spaces. There is also a nice photo etch set of schurzen armor skirts. They look very good in place.
The only complaint I had is
that there was no zimmerit on this kit.
The box art shows a StuG with the coating so I foolishly assumed that
was what was in the box. My fault for
not looking more closely. So, I ended up
having to buy the Eduard photo etch zimmerit set. The PE zimmerit looks fine when its finally
in place but it was quite a bit more work than I expected. The problem is that the thin metal sheets
leave a very unrealistic looking edge if you just slap them on as-is. In real life, zimmerit was applied in a paste
form and the edges blended somewhat into the armor to which it was
applied. I was able to fix this by
applying Tamiya putty to the edges which worked quite well. It took a LOT of putty though.
The rest of the build was pretty
much straight from the box. Since the
StuG was going to be set on uneven rubble in the scene I snipped off some
locator pins on the bogie assemblies to allow them to articulate realistically. The tracks are the famous Dragon “Magic
Tracks” which are just excellent. I have
a weakness for individual link tracks and these are designed for the best
balance of realistic detail and ease of assembly. I give top marks to the Dragon engineers on
these.
I painted the vehicle using an Iwata
Eclipse double action airbrush. I
usually don’t use primers because I don’t like the idea of muting detail even a
little. However in this case with so
much photo etched metal underneath I didn’t want to risk even a small glint of
yellow showing by accident so I gave the whole thing a coat of black Vallejo
Model Air Primer. I used this on the
advice of a friend and was very pleased.
It goes on without thinning and gives an excellent surface for paint to
adhere to. Vallejo also makes a red
primer which replicates the actual primer used by the Germans on their armored
vehicles but I wasn’t going to be chipping like crazy so I chose black because
it would act as a pre-shade. Any deep
recesses on the vehicle would be nice and dark as if in a shadow, just like on
a full size vehicle.
| Even though the photo is out of focus you can see how important it is to blend the camouflage colors together. |
After that I base coated the StuG
with Tamiya XF-59 Dark Yellow. I then
added camouflage colors. I used Tamiya
XF-64 Red Brown mixed with about 25% XF-52 Flat Earth. I also used Tamiya XF-58 Olive Green mixed
with a small amount of XF-73 JGSDF Green.
I free-handed the camouflage pattern making frequent checks on
photographic references. I followed this with judicious chipping using a
graphite artist pencil.
At this step the StuG looked very
garish and completely unrealistic. A
wash with black, then burnt umber artist oils helped to blend the colors
together. I followed this by adding a
few drops of XF-52 Flat Earth to thinner and airbrushing the entire
vehicle. I saved the final dry-brushing
step for when the StuG was set in place in the diorama.
The Building and Groundwork
In his excellent book How to Build Dioramas, Shep Paine
references the StuG IV diorama and states that, “A simple farmhouse like this
one can be assembled in just two or three evenings, and the results are well
worth the effort.” With his skill level
I have no doubt he could knock one out in an evening or two but I’m not Shep
Paine nor do I have a red “S” on my chest.
In my case the above statement would be true if you substituted the word
“evenings” with “months”. All kidding
aside, I tried to make it as close to his as possible with just a few twists.
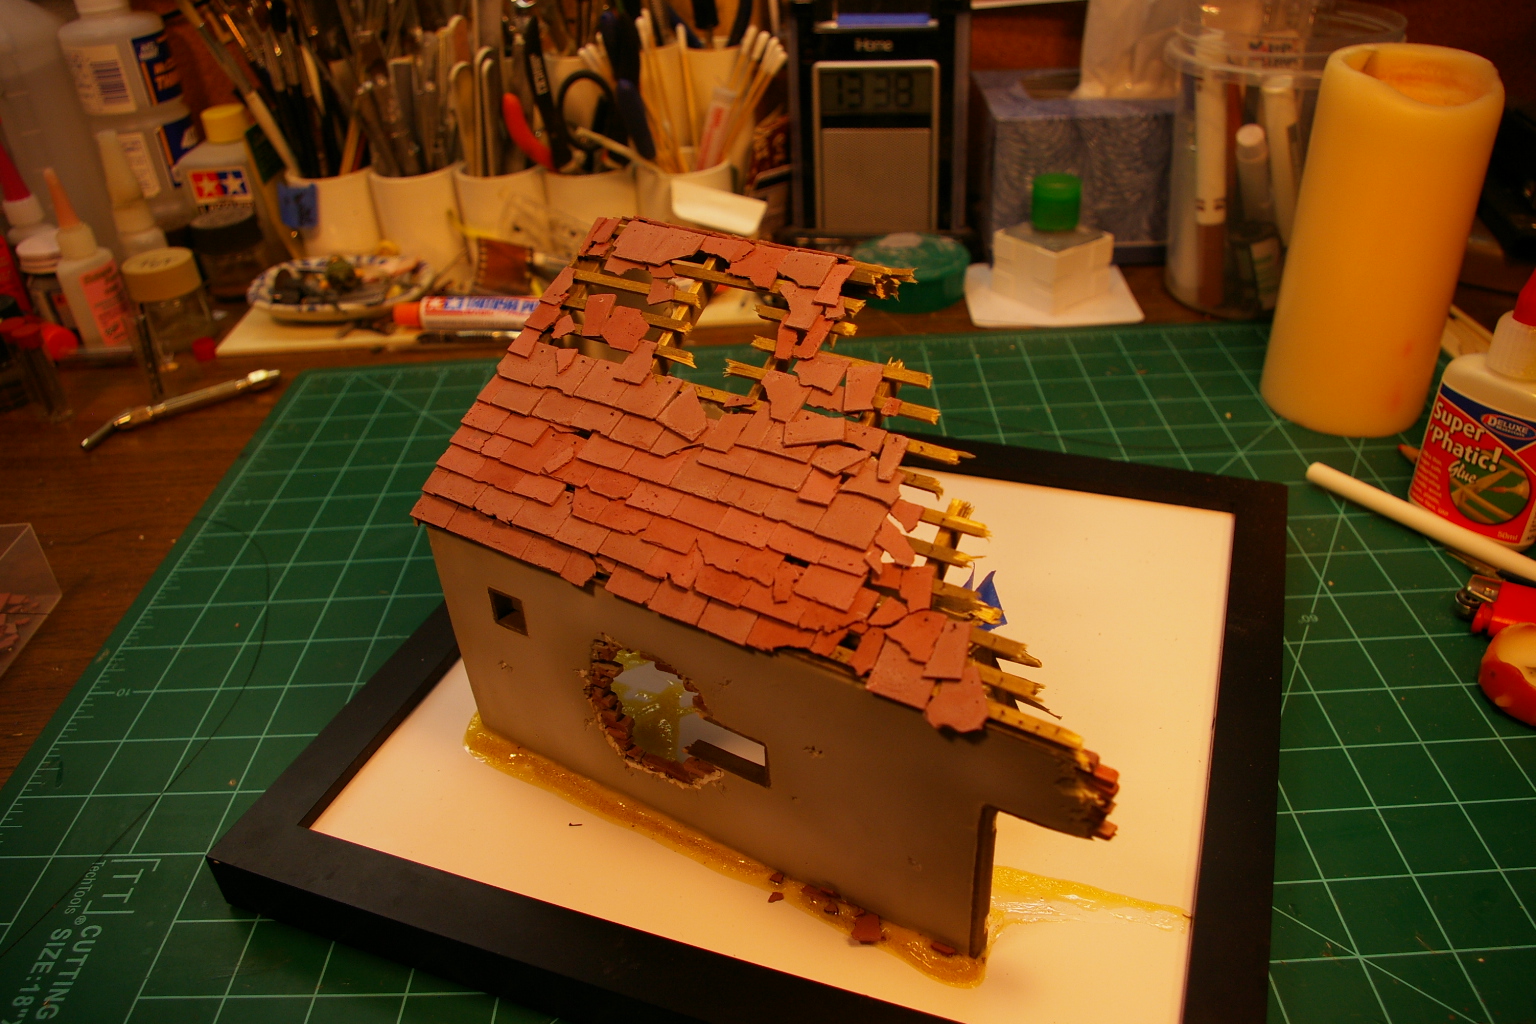
The walls were made from styrofoam
art-board. I cut these and glued them
together with Gorilla Glue. Since few
buildings in Western or Central Europe in this time period were made from pure
cement or adobe I placed bricks on the jagged broken ends. There are commercial 1/35 scale bricks available
but I was going to need a huge amount for the walls and rubble so I opted to
make my own silicone rubber mold. In the
end I think I saved a few dollars and I have the molds that I can use again if
ever get the insane urge to build a diorama with a bombed out building. The bricks are simple plaster tinted with
water base craft paint.
Once the bricks were set in the
walls I covered them with drywall plaster.
It goes on rough but once sanded smooth it looks very realistic. I should add here that this step is very
messy and would be best done anywhere but in your workshop. If you have ever taped and sanded drywall you
will know what I mean. Fine white dust
gets everywhere. Best to do this outside. Once the walls were sanded to my
satisfaction, I added basswood framing to the doors and windows. I painted the walls buff lightened with
white. I weathered the walls with washes
of black and burnt umber artist oils.
The ceiling and roof frame are also
made from basswood of varying sizes. I
stained them with thinned Tamiya acrylic paints.
I tried a number of options for the
roof tiles and wasn’t happy with sheet plastic or paper products. They just didn’t look right. I finally ended up making a mold from
silicone rubber which was just a simple one stage mold. I used plaster tinted with water base craft
paint to make the tiles just like the bricks.
When dry they were fragile but the texture was perfect. Even when broken they looked just like scale
roof tiles. I glued them in place one by
one and once set I was able to drill the small nail holes without any
problem.
The nails are stretched sprue. I made the nail head by simply moving the end
of the sprue close to a candle flame.
The end obligingly flattened out and took the form of a convincing nail.
The rain gutter and drain spout were
an afterthought. While working on the
diorama I had a problem with my own house which inspired me. You see, years ago I built an addition on the
back of my house (I’m talking about the 1/1 scale house I live in, not the
diorama). I didn’t install a rain gutter
thinking it wasn’t necessary. Well, a
snowstorm followed by a thaw and a rainstorm piled a lot of slush and water up
against the outside of the house causing the water to seep up over the
foundation, flooding a room. So, as I
was pulling up soaked carpet I gained a new appreciation of the importance of
rain gutters. I figured my 1/35 scale
house ought to have one too. It was all
pretty simple. I just bent sheet brass
around varying thicknesses of styrene tube and used CA glue to set it all in
place. I painted the gutter and drain
spout with Model Master Burnt Iron. Now
if only the gutters I need to install on my 1/1 scale house were that simple.
The base groundwork is Elmers Wood
Putty. I spread this and covered the
rubble area with an initial level of bricks and basswood debris. Since the building wasn’t completely
destroyed I reasoned that there should be some relatively debris-free area outside
where the walls were still partially intact.
In this area I used Woodland Scenics Static Grass followed by Silflor
grass tufts. I painted the grassy areas
varying shades of olive and green followed with drybrushing successively lighter shades of beige and yellow. I did the final drybrush with XF-4 Yellow
Green.
Once things were in place it seemed
like I needed to balance the scene so I added some trees. This also gave the scene some needed color
variation and tied the “inside” and “outside” of the scene together since the StuG
had foliage camouflage. The trees and
shrubs are very simple. I used seafoam
for the trunks and branches. Seafoam is
available in the US from Scenic Express.
I mix several shades of Noch-brand leaves (also available from Scenic
Express) in a Tupperware container. After trimming a seafoam twig into the desired size and shape I sprayed the
branches with 3M photo adhesive. I then rolled the “tree” in the
container of leaves. A final spray of
heavy duty hairspray served hold the leaves in place.
The Noch leaves are usually too bright a shade of green but this can be
easily fixed by shading the leaves with an airbrush using heavily diluted olive
or dark green paint.
One mistake many diorama builders
make is in the composition of rubble that makes up a ruined building. It’s important to remember what materials the
building was actually made from and include those components in the
rubble. Even brick buildings use large
amounts of wood and plaster. So, a
destroyed brick building should have copious amounts of broken and gnarled
boards mixed in with the bricks and plaster.
I spread the rubble as realistically
as possible, placing many bricks and other pieces one at a time with tweezers until
I got just the look I was going for. I
fixed everything in place with diluted Deluxe Materials Super ‘Phatic
glue. This water base aliphatic glue is
specially designed to adhere to porous surfaces. It dries relatively fast and is easy to clean
up. Once this was dry I applied washes
of black artist oils diluted with mineral spirits. I fixed the StuG in the rubble with the same Super
‘Phatic glue. Once this was done I
sprayed the entire diorama, trees and all, with thinner tinted with a few drops
of XF-52 Flat Earth. This served to
blend all the components together. I
then drybrushed all the components with ground pastel chalk. This also served to bring all of the
component parts, building, vehicle and figures together.
The advertisement on the side of the
building serves two purposes; it helps place the scene in France and it also
adds a little color to the diorama. The
partial word is fourrages which means
“forage” or “animal feed” in French. I
got the idea from a 1930’s French farm products advertising poster. The electric wires are stretched sprue and
the insulators are blocks and pulleys from a 1/96 scale sailing ship kit. These downed power lines were an afterthought. Had I planned a little better I would have
run the lines inside the building as well since you would be able to see where
they go. Oh well, next time. The derelict plow is there simply to fill
space and even out the composition of the scene.
The
Figures
Luckily there are a lot of figure sets for Panzer crewman out on the
market. I was able to find several that
met my needs. I used various arms and
heads from the Dragon German Officers Kursk 1943 set and German Tank Crew
1939-43 set.


I’m not a great figure painter, so I
was happy to have black panzer uniforms on the figures. Black is probably the easiest uniform color to
paint because all you really have to do is highlight the folds in the
clothing. The shadows are already black. The camouflage trousers on the standing
figure are made with Shinsengumi camouflage pattern decals. This is a small sheet (about 5”x7”) of the
camo pattern that can be applied to figures.
This is the first time I’ve used this product and now that it’s over I’m
not sure it wouldn’t have been easier to just paint the camo pattern on the
trousers. The decals are a terrific idea
and I think they really do come off well, but they are a bit tedious to
apply. I found that I needed to cut them
in small pieces and apply them one by one on the folds matching the clothing
seams as much as possible. Then I needed
to use copious amounts of decal solvent to get them to nestle up to the
irregular surface of the figure. In the
end I did lose some of the molded detail on the figure and I was disappointed with
this.
All in all I think it turned out ok though.
For the most part, I replicated the poses that Mr.
Paine used on the figures in his diorama. I had the standing figure holding a newly
acquired souvenir, a US airborne helmet.
This also helps to set the time and place of the scene. The 17th SS Panzergrenadier Division
faced off with elements of the US 101st Airborne and 2nd Armored divisions during the
Normandy Campaign in and around the town of Carentan in June of 1944. I used a mixture of Vallejo acrylics on the
figures. I also used the Archer Fine
Transfers German SS Uniform Patches
set which is outstanding as are all of Archer’s products.
I couldn’t resist placing the crewman
relieving himself in the corner of the building. I ran across him in the Dragon German
Warriors 1940-41 figures set and immediately thought that the dark corner of
the ruined building was the perfect place for him. Most people who see the diorama don’t even
notice he is there, which is after all the whole point when nature calls.
The stowage on the rear engine deck
is from the spares bin mostly. The
cardboard box is from the excellent line from J’s Work.
The base is a simple discount store
black plastic picture frame. I used a
slightly larger size base than the original Mr. Paine built which allowed me to
add the green area outside. Since this
diorama would be impossible to salvage if dust accumulated on it I built a
cover out of clear acrylic. An internet
search revealed Delvie’s Plastics (http://www.delviesplastics.com) which will
cut custom sizes. I simply had to
measure carefully, place the order with the supplier and cement the pieces
together with IPS Weld-On #3. I
constructed a small border from Evergreen styrene around the base to hold the
acrylic cover in place.
Conclusion
This is probably the most involved building I’ve ever created for a
diorama. I made few mistakes which
bother me, but hopefully they don’t detract too much from the overall
presentation. For example, when I
measured and cut out the walls I didn’t take into account that the StuG would
be sitting on a layer of rubble. As it
worked out, the StuG sits too high for the gunner to see out of the hole blown
in the side of the house and as such is effectively
blind where it is. No one has noticed so
far but it still bothers me.

The other flaw that nags at me is
unavoidable and simply a function of the subject matter itself. From my own experience with damaged or blown
up buildings in Iraq I have found that it is generally a good idea to stay out
of them. They have a nasty tendency to
fall down on top of whatever is in them, especially when things are going
“boom” all over the place. The building
the StuG occupies in this scene would offer great cover and concealment but I
would be very wary of falling tiles at best and the whole shebang crashing down
on me at worst. One shot from the StuG’s
75mm gun and the whole thing would likely collapse. But all that is nitpicking. Sometimes artistic license needs to trump
what reality dictates. In this case I
think the composition, graciously supplied by Mr. Paine back in 1972, works
wonderfully.