
I like tank models with interiors. They are immensely more interesting than a model posed with the hatches closed. In recent years the modeling community has been blessed with tons of spanking new aftermarket interior sets. Some manufacturers (thank you Dragon and Tristar) have even begun to supply kits out of the box with at least enough detail so the tank doesn’t look like an empty eggshell if the hatches are posed open. I’ve waited in vain for an aftermarket set for the Japanese Type 97 though. So, since whenever I undertake a major scratchbuilding project some manufacturer chooses that exact moment to offer the very set that I just spent months constructing rivet by rivet, I figured I would do the modeling community a favor and build an interior for the Fine Molds Type 97. I fully expect to read about a wonderful full resin upgrade set for the Type 97 on the Perth Military modeling website in the coming weeks.

The Kit
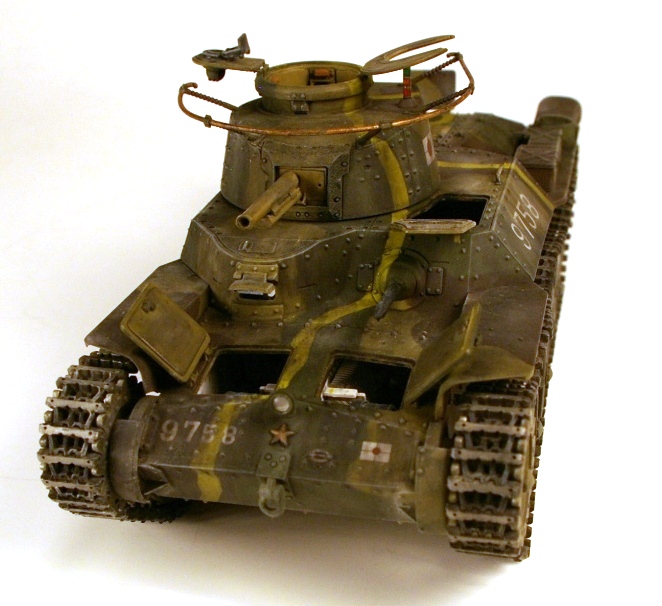
This is the Fine Molds Type 97 Chi Ha Early Production Hull kit. It’s really a nice little kit that I can’t find much fault with. While there are some details that have been somewhat simplified, it’s a quantum leap over the very dated Tamiya Type 97. It also has some excellent details like clear parts for the signal lamp, a periscope mount in the commander’s hatch, a small photo etch fret and a full 57mm main gun. Another feature that was a godsend for me was that all the hatches (including engine access hatches) are separate pieces which can be posed open. Other than the gun though, there is no interior provided. The molding is crisp and generally very accurate. There are no fit issues beyond a small gap when mating the upper and lower hull. This was easily filled with a styrene strip.

The
Interior
Anyone who has built more than one or two kits knows how a “spares bin” develops. I’ve been modeling off and on since Lyndon Johnson was president and I’m a chronic pack-rat so I’ve got multiple spares bins and lately have even started organizing them by type. I’ve got a “Sherman” spares bin, a “Photoetch” spares bin, a “Clear Parts” spares bin etc., etc, etc… As it turned out this was where I was able to find most of my parts for the Type 97 interior. Aside from a set of Model Kasten tracks, I did not have to buy any aftermarket bits for this project.

The transmission and seats were from a Tristar PzKpfw 38 Skoda kit that came with an interior. Both are conjectural and represent a certain amount of artistic license. Japanese Type 97s generally had an aluminum housing over the transmission. In at least some cases this housing was left off for ease of maintenance however. It would actually have been easier to fashion the housing from sheet plastic but it would not have been as visually interesting. Besides, the Skoda transmission looked very nice. It is not exactly identical to the Type 97 transmission but not so far off that it wouldn’t work.

The instrument panel is the right size and in the right
place but the instrument bezels are not in exactly the right position. This is because it’s from part of a photo
etch sheet from a 1/48 scale B5N Kate torpedo bomber kit. The gear shift handles are generally correct
though. Those are made from styrene rod
and wire.

The steering brakes are from a long gone unidentified
kit. Like the transmission, they are not
exactly identical to the Type 97 brakes but very close. The drive shaft covering is made from sheet
brass. This is more or less accurate.

The firewall was by far the most time consuming part of
the interior. Reasoning that I might
someday want to do another interior, I created a master using parts from a
Tamiya Type 2 Ho Ni kit, sheet styrene and brass screen. I cast several resin copies from the master
and wasn’t overly happy with the results since I used brass screen that was too
small. If I had it to do again I would
used bigger screen and add a few other details.
In the end I just used the master in the kit. Easy come, easy go.

Another big challenge in this project was the thermal
panels. Most Japanese tanks in WW2 and
earlier had asbestos panels installed on most of the interior walls. This was to keep the tank interior cooler in
hot weather for the crew while not adding a fire danger. On the original vehicles it looks and feels
something like a very thick pile carpet or automotive air filter material.

 |
| Thermal panels inside the turret of the Type 97 Improved Turret Ch-Ha at the Aberdeen Proving Grounds. Almost all Japanese tanks had this feature in one configuration or another. |
I tried several different materials to replicate this unsuccessfully. The challenge was to get the correct texture while keeping the thickness of the panel in scale (which is VERY thin). In the end, I settled on 300 grit sandpaper. Not perfect, but I think it worked well overall. I created the framing from yellow Tamiya tape and made the rivets from 3D textured paint.


The engine access hatch on the rear deck presented a small problem. I’m normally not that interested in engines so when I had access to the Type 97 at Aberdeen I didn’t ask to “look under the hood”. I regretted that. I wasn’t at all sure what went under this hatch and none of the references I had available gave me much help. Eventually I ascertained that this hatch was for access to the batteries. A cooling fan would also have been visible. The spares bin supplied a fan and pieces that looked convincingly battery-like. No other part of the engine would be visible so I painted the rest of the compartment black and moved on.

Work on the upper deck interior consisted of adding rivets, a radio and a few instrument dials. Again, all from the spares bin. The teeth in the turret ring are from corrugated Evergreen sheet styrene cut perpendicular to the ridges in a small strip, then bent around the opening.

 |
| Rack for ready rounds in the Type 97 Improved Turret Chi-Ha at Aberdeen. Early version Type 97s had racks which were very similar. |
All the turret interior needed was some thermal panels, pistol post covers and an ammunition rack (made from sheet styrene). Very little of this is readily visible when the turret is in place on the vehicle.

The Type 97 machine guns are also from the spares bin, either a Tamiya or Dragon figures set I think. I added the shoulder stock found on the vehicle mounted Type 97 machine guns and telescopic sights made from stretched sprue.


A small detail which I doubt anyone will ever notice are the exhausts. The ends of the kit exhausts were solid and it bothered me. I tried drilling them out but the ends are flared flat so this wasn’t going to be a solution. With a small bit of trial and error I was able to sandwich some sheet styrene on the ends so that they appeared hollow on the end. It’s a small detail but I like the fact that they don’t look solid now.

Tow cable is from the spares bit as well. I really didn’t like the molded on tow cable that came with the kit. So, I removed the tow hook from the piece and attached them to a braided cable from a long gone kit.
The
Insanity… er… I mean The Tracks
Don’t get me wrong. I’m a huge fan of individual link tracks, especially when there needs to be track sag. These were tiny links though, and including the pins there was four pieces to each link. And there were 94 links per side. Ouch. I had to keep off caffeine for the week and a half it took me to get these put together. They are beautiful when they are done though.

 |
| One the tracks were assembled and mounted on the model I placed rolls of tape in the spaces between the fenders and the tracks to give them a realistic sag. |


Painting
I used Tamiya acrylics throughout on this project but with the exception of the interior, which I painted XF-2 Flat White, I custom mixed all the colors I used. I was painting this tank to be one belonging to the 7th Tank Regiment on Luzon in 1941-1942. Without going into too much detail, Japanese tanks during this time period and theater were usually painted with a combination of three colors; 枯草色 (karekusairo) or Parched Grass (a greenish khaki), 草色 (kusairo) or Grass Green (a medium green) and 土地色 (tochiiro) or Earth (a medium somewhat reddish brown). I mixed these using the “this looks good to me” method, adding a little of this color and a little of that color. The base color for Parched Grass was XF-49 Khaki. Grass Green was XF-58 Olive Green and Earth was XF-64 Red Brown.


I masked the camouflage pattern with yellow Tamiya
tape. The pattern was fairly complicated
and the many rivets and irregular surfaced didn’t help any.
The decals are those supplied with the kit. The only surface preparation I used was to
buff the area where the decal was to be applied lightly with a shop wipe to
smooth the surface slightly. The decals
all nestled down nicely with liberal applications of Micro Sol.

I painted the tracks with a mixture of XF-1 Flat Black and XF-56 Metallic Grey, then dry brushed the face of each link with straight Metallic Grey.

Weathering
I gave the tank an initial weathering with black and brown artist oils, filling in panel lines, creating vertical streaking and paying particular attention to rivets and other detail.

Once this was dry I dry brushed the tank with ground pastel chalk, picking out highlights like rivets, tools and panel edges. I gave the tracks and running gear a wash with a slurry of ground dark brown pastel chalk.

I applied a wash of black artist oil over the top of this once it was dry to give it a nice 3D effect.


