In this fourth installment of the Vehicles of the 640th Tank Destroyer Battalion we look at the M3A1 Halftrack:

Halftracks in the 640th were originally intended to function as a prime mover for the unit’s towed M5 Anti-tank guns. After the towed guns were replaced with M10 GMCs however many of the halftracks were retained and put to use by the battalion’s

reconnaissance company. In the official history of the 640th it was particularly noted that halftracks gave the battalion an unprecedented degree of mobility during its lightning advance against Japanese forces on Luzon.

The Kit:
Dragon began releasing its series of US halftracks in 2006. They are light years ahead of the only other game in town, the venerable Tamiya kit. The M3A1 Smart Kit is no exception. As one would come to expect from Dragon, the molding is superb and devoid of flash or unworkable ejector pin marks.

There are some excellent value-added features to the kit. The mines for the side racks can be built with photo-etch handles and pressure plates that are striking compared to the injection molded alternative. There are also numerous extra parts such as machine guns and other weapons which are welcome additions to the spares bin.

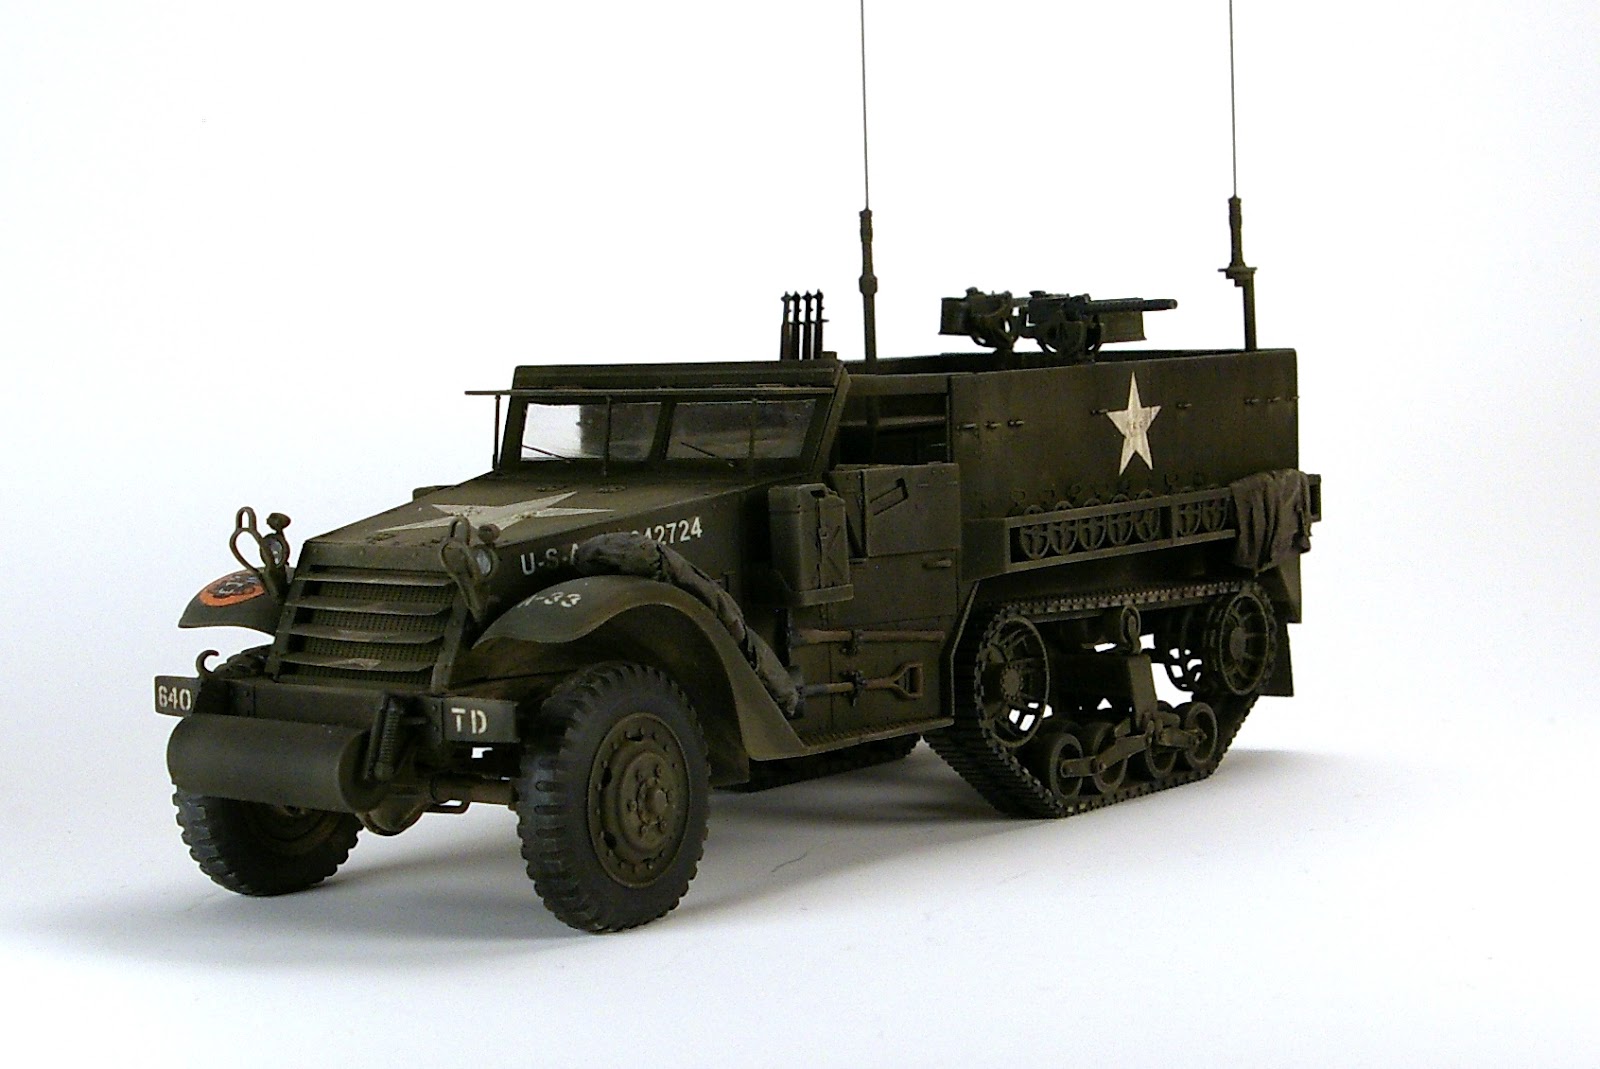
There are options to build an M3, M3A1 and M3A2 in the kit. I opted for the M3A1 as shown in photos of the 640th on either Guadalcanal or New Britain in 1943. The halftracks in the photos appear to be early M3A1s missing the pulpit mount for the M2 machine gun.

The halftracks in the photos also sport the unditching roller on the front bumper. Subsequent account of the 640th in action on Luzon notes that their halftracks (at least some of them) were equipped with winches on the front bumper instead of the roller and that it was a critical piece of equipment which allowed the reconnaissance company to ford many rivers and creeks they would not otherwise have been able to. Never the less, I modeled this kit with the roller to make it more in line with the photo.

The Build:
I built the kit almost completely stock box. About the only exception I made was to use resin tie downs from Tiger Models. These little resin beauties are inexpensive and give eye popping detail way out of proportion to their cost an effort.

As with any open top vehicle, it pays to plan ahead when painting. There are a number of areas which if left until after the final assembly is done, are very problematic to paint. So, I painted the interior of the cab, cargo bed and chassis before they were joined.

I painted the base color using Tamiya XF-62 Olive Drab lightened to scale with XF-60 Dark Yellow. I then post shaded with straight Dark Yellow diluted to almost water consistency with isopropyl alcohol.

I used the Archer Fine Transfers set of halftrack instruments and placards for the dash board. They went on like a charm and added a lot to the look of the cab.

I decided to make the weathering understated. I started the weathering with a wash of black artist oils mixed with a touch of burn umber. I went heavy on the wash and mixed it heavier on the undercarriage and wheel wells to replicate areas which would be shaded from normal light. I used a lighter wash on the upper areas and made special use of the many vertical spaces. I dabbed small dots of heavier oil paint on the sides and dragged a brush laden with mineral spirits in an top to bottom motion. This left vertical streaks on the sides that suggested water and grime draining down the sides of the vehicle. I left this to dry for a day or so then gave the vehicle a light dry brush with light brown pastel chalk. I accentuated the vertical pattern on the sides with the pastels which gave a nice three dimensional feeling to the whole work.

The markings were simple and easy. I made a positive mask of all the stars and placed them on areas I had painted white before painting the main color and shading. The only decals were the bumper codes (which came with the kit) and the registration numbers.

It was tempting to go hog wile with the stowage. Photographs of halftracks in combat invariably show them loaded down heavily with packs, ammo, tents, camo netting… you name it, and I have to admit they look very, very cool. I wanted to keep this kit as stock as possible however so the only stowage I placed on the exterior of the vehicle were some rolled tarpaulins made from rolled tech wiped stiffened with diluted white glue. The tie downs are lead foil. On the interior I placed another tarp, some ammo boxes, a box of K Rations and some tripods for the M1919 30 cal machine guns. I also paid more homage to my kindred spirit souvenir hunters with a trophy flag and Japanese bayonet sitting on a passenger seat.

For the flag I used the decals that came with a set of Master Box Japanese infantry figures. The decals were very old and crackly and required heavy coats of Microscale liquid decal film to keep from coming apart when they hit the water. I rolled out a thin piece of Apoxie Sculpt and trimmed it to the size of the flag. After draping it naturally on the seat and letting it dry I applied the decal.

I’ve been criticized before about how I place soldiers’ war trophies and souvenirs on models I build. Let me just say that yes, I know they wouldn’t be left out in the open for fear of being stolen. My grandfather told me of his time on Okinawa during the battle, “You could leave your wedding ring, wristwatch and a huge roll of cash sitting out on your pack and no one would touch it. But if you left even the smallest Japanese trophy, souvenir or trinket out where it could be seen, it would be gone before you could blink.” (he brought back some very cool stuff by the way) So, before anyone sends me an email reminding me that a battle flag like that would never be left sitting out, let me just state for the record, yes I know. It’s called artistic license. It just wouldn’t display as well stashed under the driver’s seat.
No comments:
Post a Comment