 When it entered service in 1937 the Nakajima Type 97 B5N was a quantum leap over the obsolete biplanes in use by the Imperial Japanese Navy. Though the B5N2 was faster and more capable than contemporary Allied torpedo bombers like the TBD Devastator and Fairey Swordfish, it was nearing obsolescence by 1941. Nevertheless, B5Ns (code named “Kate” in 1942 by the allies) flown by well-trained aircrews achieved significant successes at the battles of Pearl Harbour, Coral Sea, Midway, and Santa Cruz Islands. B5Ns were instrumental in the sinking of four US carriers (Lexington, Wasp, Hornet and Yorktown) early in the war.
  The only known photo of of torpedo carrying B5N2s during the Pearl Harbor attack.
This B5N2 Kate is the aircraft flown by Lt.jg Jinichi Goto during the attack on Pearl Harbour. Goto commanded the second echelon of torpedo bombers from the aircraft carrier Akagi. His torpedo hit the USS Oklahoma during the first minutes of the attack.
At 7:58 am on the day of the attack, as Goto flew low over the Southeast Loch of Pearl Harbour, about 50 feet above the water, the clustered masts of the battlewagons filled his windscreen. "All I could see," he said, "was a forest of battleships. I could not tell which was the bow and which was the stern.
"I aimed at a central battleship, [the Oklahoma] and I was so carried away that all I could yell out was ‘fire’. I forgot to say ‘ready, fire,’ but the man who was supposed to pull the lever (to release the torpedo) did pull it.” After releasing it, "My observer reported a huge waterspout springing up.”
 LT jg Jinichi Goto
While Goto was successful in launching his torpedo it was not his primary mission that morning. Had there been anti-torpedo nets in place around the battleships Goto and his two wingmen were to torpedo the nets then crash into them to clear the way for following planes to launch their torpedo attacks. Luckily for Goto and his crews no nets were in place on the morning of the attack.
First released in 2001 the re-released over the years, the B5N2 kit from Hasegawa is a gem. The only real flaws are several ejector pin marks in spots in the cockpit walls which are nigh impossible to remove. The bright side is that when the parts come together the pesky marks are not visible at all.

Speaking of the cockpit, it’s superb! The engineers at Hasegawa outdid themselves creating beautiful detail and ease of assembly. The cockpit is the focal point of almost every aircraft model and usually I find aftermarket photo etch or resin parts are necessary to create a “wow” cockpit. Not here. The only aftermarket parts that really benefitted this cockpit were the pilot and observer seats (with belts) and a few bits and bobs on the throttle quadrants. I painted the cockpit interior with Model Masters 2062 RAF Interior Green. I lightened this to scale with a judicious glaze of 2136 Gulf Armor Sand and followed up with a wash of 2040 Aircraft Interior Black. The tragedy of it all is that all that wonderful detail gets all but hidden in the depths of the fuselage. At least I know it’s there.

Going...

... going...

... gone!
The engraving and overall attention to detail is state of the art even though the kit is ten years old. The kit comes with options for flaps up or deployed which is a very nice touch. The fit overall is very good. There was a small exception in the area of the engine mount just forward of the cockpit but this was easily fixed with some gap filling cyano glue

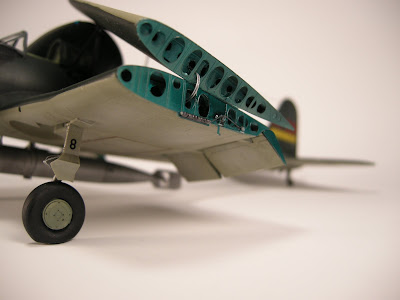
The main landing gear wheels are slightly overscale. I opted to use a True Details resin set which added to the final scale look of the aircraft.  This version of the Kate comes with the option to construct the kit with the wings folded. A photo etch fret comes with the kit to fill the empty wing ends. The parts are accurate but are very simplified. I added a second wing rib inside the open ends to give a more three dimentional look to the parts and added some details with .3mm solder wire, stretched sprue and Evergreen stock. At first glance the procedure for making the folded wing version seemed like it was going to be complicated and dodgy. In the end it was fairly simple and came off like a dream. I mixed my own “aotake”, the metallic blue colour used on Japanese aircraft, by mixing Testors 4658 Clear Blue, 4668 Clear Green and a touch of 4683 Chrome Yellow. I painted the interior wing surfaces with 1781 Aluminium first, then the “aotake” mix.


 I painted the dorsal side with Model Master 2116 IJN Green. I post shaded this with the base heavily diluted with thinner plus an equal amount of 2136 US Army Sand. The kit instructions call for the underside to be natural metal. I wasn’t happy about this since I hate doing natural metal finishes. I don’t like them and they don’t like me. However, luckily for me the most recent scholarship seems to indicate that most B5Ns at Pearl Harbour were painted in the common IJN Gray Green color. I replicated this by mixing Model Master 2117 IJN Sky Gray with a touch of 2004 Skin Tone Shadow and 2091 Dunkelgrun RLM 82.
 The markings for Goto’s aircraft weren’t included in the kit per se, but the markings it came with were easily convertible. I masked the hi no maru national insignia, tail drift gauge lines, tail stripe and fuselage band before painting the base colors. With simple shapes like these I find it is almost always worth the extra effort to paint on any insignia and markings possible. Markings that are actually painted on almost always look better than a decal, no matter how “painted on” the decal “looks”. The kit decals that I did use (the tail numbers and large block numbers on the wing undersides) nestled down to the engraved detail nicely with Testors 2145 Decal Solvent Solution.

 Everything masked and ready to paint.

 This version of the Kate comes with the option to construct the kit with the wings folded. A photo etch fret comes with the kit to fill the empty wing ends. The parts are accurate but are very simplified. I added a second wing rib inside the open ends to give a more three dimentional look to the parts and added some details with .3mm solder wire, stretched sprue and Evergreen stock. At first glance the procedure for making the folded wing version seemed like it was going to be complicated and dodgy. In the end it was fairly simple and came off like a dream. I mixed my own “aotake”, the metallic blue colour used on Japanese aircraft, by mixing Testors 4658 Clear Blue, 4668 Clear Green and a touch of 4683 Chrome Yellow. I painted the interior wing surfaces with 1781 Aluminium first, then the “aotake” mix.


 I painted the dorsal side with Model Master 2116 IJN Green. I post shaded this with the base heavily diluted with thinner plus an equal amount of 2136 US Army Sand. The kit instructions call for the underside to be natural metal. I wasn’t happy about this since I hate doing natural metal finishes. I don’t like them and they don’t like me. However, luckily for me the most recent scholarship seems to indicate that most B5Ns at Pearl Harbour were painted in the common IJN Gray Green color. I replicated this by mixing Model Master 2117 IJN Sky Gray with a touch of 2004 Skin Tone Shadow and 2091 Dunkelgrun RLM 82.
 The markings for Goto’s aircraft weren’t included in the kit per se, but the markings it came with were easily convertible. I masked the hi no maru national insignia, tail drift gauge lines, tail stripe and fuselage band before painting the base colors. With simple shapes like these I find it is almost always worth the extra effort to paint on any insignia and markings possible. Markings that are actually painted on almost always look better than a decal, no matter how “painted on” the decal “looks”. The kit decals that I did use (the tail numbers and large block numbers on the wing undersides) nestled down to the engraved detail nicely with Testors 2145 Decal Solvent Solution.
  Everything masked and ready to paint.
Weathering was fairly simple. IJN aircraft at Pearl Harbor were well maintained so they didn’t display the rugged appearance that aircraft did later in the war. The Japanese air units had been rigorously training in the months leading up the operation however so some wear and tear would have shown on the planes. After giving the whole model a gloss coat of Future I gave it a wash with flat black acrylics mixed with flow enhancer. Once this was dry I used a Prismacolor metallic silver pencil to create judicious chips and wear areas.

 The star of the build is the Type 91 aerial torpedo. The B5N kit I used is for a high level bomber so I pirated the torpedo parts from the Tamiya G4M Betty kit. It already had the wooden fin extensions so all I needed to do was fabricate the mounting rack and anti-sway struts. These were done with Evergreen stock and .3mm lead solder. I painted the torpedo with Model Masters 1781 Aluminium and 1780 Steel.
 While not quite what I would call a “weekend build” this Hasegawa kit went together quickly. Had it not been for the added attention the folding wings required I would have been done in just a few evenings of work. The fine engineering made it a relaxing build and the fine detail made for a very satisfactory end product.

The star of the build is the Type 91 aerial torpedo. The B5N kit I used is for a high level bomber so I pirated the torpedo parts from the Tamiya G4M Betty kit. It already had the wooden fin extensions so all I needed to do was fabricate the mounting rack and anti-sway struts. These were done with Evergreen stock and .3mm lead solder. I painted the torpedo with Model Masters 1781 Aluminium and 1780 Steel.  While not quite what I would call a “weekend build” this Hasegawa kit went together quickly. Had it not been for the added attention the folding wings required I would have been done in just a few evenings of work. The fine engineering made it a relaxing build and the fine detail made for a very satisfactory end product.
No comments:
Post a Comment