
Ever since as a boy I watched a Pennsylvania National Guard unit drive past my house in their spiffy M113 armored personnel carriers I’ve been enthralled with the boxy vehicles. I built Tamiya’s motorized kit when it first came out and spent many happy hours on the family room floor setting up obstacle courses for it to climb over. When Squadron came out with their excellent
M113 In Action volume I nabbed it off the shelf of the local hobby shop as fast as it was put on display. Inside was a photo that really grabbed me.

It showed a modified Israeli M113 in the Sinai circa 1972. I immediately wanted to model this exact vehicle. I made several feeble attempts but eventually gave up. Fast forward a few decades and I was ready to give it another try. Unfortunately, while there are many modeling options for later versions of IDF M113s, there is no kit in production that represents an early M113. So, using the venerable Tamiya M113 kit which was recently re-released, some Eduard photo etch sets and a plentiful stock of Evergreen styrene I set out to recreate a 1973 era Israeli M113. In my latest (and final) attempt I combined characteristics found in photos of several different IDF M113s, all circa the 1973 Yom Kippur War.

Surprisingly, there seem to be relatively few photographs of early M113s in Israeli service. But with the assistance of some incredibly helpful friends on the Missing-Lynx website I was lucky to find a few excellent photos which gave me the data I needed to get the job done.


The project presented several challenges. The interior required major rework and outside there were racks, rails and specific machine gun mounts that would need to be scratch built.

The Tamiya kit is old and the details are definitely a product of 1970’s technology. Photo etch detail sets from Eduard were necessary both inside and out. I began with the interior.

Near as I have been able to tell, M113s taken into service by the IDF were configured with centerline seats rather than outboard seats like their US counterparts. They had rather extensive ammo can racks installed on the hull walls as well.

I created the seats from Evergreen sheet and rod. The seat bottoms were bent and formed with the help of a Tamiya photo etch bending tool. The rounded edge of the upright seat back was a bit of challenge but I was able to represent this by bending a length of Evergreen plastic rod and gluing it along the top edge. The ammo racks on the inside were fairly straight forward using plastic sheet measured, trimmed and glued into place. I also fabricated a heat shield around the interior heater with sheet plastic and added some lead solder for pipes and wires.

The kit comes with all the interior placards for a US produced M113. Since the M113s used by the IDF in 1973 were manufactured under license in Italy, research indicated the placards were in either Italian possibly Hebrew. I opted for Hebrew since it was after all an Israeli vehicle though this might be artistic license on my part. I created the artwork on my trusty laptop and printed it on Testors waterslide decal paper. The other placards (mostly around the driver’s station) were too small to read so the kit decals were fine.

Once the interior was painted (M113s from this time period were painted seafoam green on the inside) I moved to the interior stowage. I used Tamiya XF-71 Cockpit Green and XF-4 Yellow Green for the interior. Photographic evidence of IDF ration boxes in 1973 is tremendously scarce so approximated some out of cardstock. I added ammo boxes, facial tissue tarpaulins stiffened with diluted white glue and personal gear from the spares box. The wooden ammo crates are from the excellent GC Laser line of laser cut wooden crates. Once everything was in place I added chipping with a #32 artist pencil. After this was done the interior got a solid wash with Grumbacher black oil paint thinned with turpeniod. This wash served to add shadow to the interior and bring out details. It also subdued the chipping and made it blend with the acrylic paint.

The flag is a nod to my own experience in M113s. In Iraq I was a rabid souvenir hunter. In 2007 while in a village in southern Iraq I ran across wadded up flag left behind by insurgents. I nabbed it and stuffed it up on my M113 pretty much exactly where the Egyptian flag is hanging on this vehicle. I figure there were probably souvenir hunters in the IDF in 1973 too. The flag is Tamiya epoxy putty flattened and rolled out paper thin. I then trimmed it to size and carefully draped it in place with the proper folds and left it to dry. Curiously enough Tamiya epoxy putty seems to take longer to dry when it is rolled thin than when it is in a thicker clump. I have no explanation for this but it took several days for the flag to get stiff enough for me to handle without deforming it. Once it was ready I hand painted the red, black and white bands and added the falcon crest in the center. The crest was from an image of the 1973 UAR flag I found on-line then printed on Testors waterslide paper.

With the interior taken care of it was time to move on to the outside. I started with the bow. Factory M113s come with a large ramp in the front called a trim vane. The trim vane, when extended keeps a wave of water from sweeping over the top of the vehicle when it enters the water at anything more than a slow crawl. Not all, but many IDF M113s had the trim vane removed since the likelihood of amphibious operations was limited. This meant I needed first to fill the locator holes for the kit trim vane and replace them with empty brackets. This was accomplished with Evergreen strip stock. Next was the much trickier trim vane extender arm. Most photos of IDF M113s with the trim vane removed have the arm off as well but there are a few photos of the superfluous apparatus still hanging there so I put one together out of trusty Evergreen stock.
 Ever since as a boy I watched a Pennsylvania National Guard unit drive past my house in their spiffy M113 armored personnel carriers I’ve been enthralled with the boxy vehicles. I built Tamiya’s motorized kit when it first came out and spent many happy hours on the family room floor setting up obstacle courses for it to climb over. When Squadron came out with their excellent M113 In Action volume I nabbed it off the shelf of the local hobby shop as fast as it was put on display. Inside was a photo that really grabbed me.
  It showed a modified Israeli M113 in the Sinai circa 1972. I immediately wanted to model this exact vehicle. I made several feeble attempts but eventually gave up. Fast forward a few decades and I was ready to give it another try. Unfortunately, while there are many modeling options for later versions of IDF M113s, there is no kit in production that represents an early M113. So, using the venerable Tamiya M113 kit which was recently re-released, some Eduard photo etch sets and a plentiful stock of Evergreen styrene I set out to recreate a 1973 era Israeli M113. In my latest (and final) attempt I combined characteristics found in photos of several different IDF M113s, all circa the 1973 Yom Kippur War.
  Surprisingly, there seem to be relatively few photographs of early M113s in Israeli service. But with the assistance of some incredibly helpful friends on the Missing-Lynx website I was lucky to find a few excellent photos which gave me the data I needed to get the job done.
  The flag is a nod to my own experience in M113s. In Iraq I was a rabid souvenir hunter. In 2007 while in a village in southern Iraq I ran across wadded up flag left behind by insurgents. I nabbed it and stuffed it up on my M113 pretty much exactly where the Egyptian flag is hanging on this vehicle. I figure there were probably souvenir hunters in the IDF in 1973 too. The flag is Tamiya epoxy putty flattened and rolled out paper thin. I then trimmed it to size and carefully draped it in place with the proper folds and left it to dry. Curiously enough Tamiya epoxy putty seems to take longer to dry when it is rolled thin than when it is in a thicker clump. I have no explanation for this but it took several days for the flag to get stiff enough for me to handle without deforming it. Once it was ready I hand painted the red, black and white bands and added the falcon crest in the center. The crest was from an image of the 1973 UAR flag I found on-line then printed on Testors waterslide paper.
 With the interior taken care of it was time to move on to the outside. I started with the bow. Factory M113s come with a large ramp in the front called a trim vane. The trim vane, when extended keeps a wave of water from sweeping over the top of the vehicle when it enters the water at anything more than a slow crawl. Not all, but many IDF M113s had the trim vane removed since the likelihood of amphibious operations was limited. This meant I needed first to fill the locator holes for the kit trim vane and replace them with empty brackets. This was accomplished with Evergreen strip stock. Next was the much trickier trim vane extender arm. Most photos of IDF M113s with the trim vane removed have the arm off as well but there are a few photos of the superfluous apparatus still hanging there so I put one together out of trusty Evergreen stock.
 The stowage racks are also made of Evergreen styrene. They were pretty straight forward. Photographic evidence seems to show a number of different styles of stowage rack to choose from so I opted for the most simple style. The hand rails were also simple. I built a jig to get the brackets as close to identical as possible. Once they were in place I added rivets shaved off an old derelict kit from the spares box and put the stretched sprue hand rail in place.
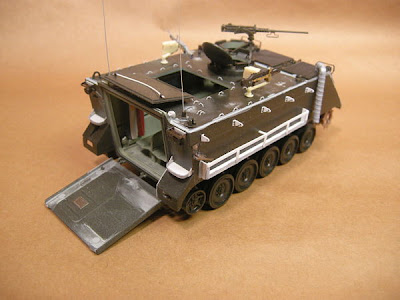
 The exhaust extender is the one modification the IDF added to their M113s that I admire most. While riding topside on my share of M113s in Iraq I’ve gulped more than my share of exhaust fumes. Having a pipe shooting the exhaust down closer to ground level makes terrific sense. Photos of IDF M113s in the Sinai and Golan seem to show both ribbed flex tubes as well as tubes wrapped with some sort of thermal insulating material. I tried a few different techniques to make the styrene tubing look right. What seemed to look best was coiling stretched sprue around the tube, then giving it several applications of Tamiya Basic Type Putty thinned with extra thin liquid cement. There was valve on one of the bends that I replicated with a small oval of frisket paper. The toggles are left over from a discarded photo etch fret from a past project.
 The light machine gun mounts were a challenge all their own. The FN MAG light machine guns both came from the Dragon IDF paratrooper figure set and are very nice pieces. The mounts were a challenge though. About halfway through building a mount from scratch I ran across the Legend IDF Tank Machine gun set. It had a beautiful example of the exact mount I needed but set only contained one and I needed two. A small cache of RTV rubber, some resin and my 5 year old son’s Lego set came to the rescue though and I was able to replicate the second mount without any trouble.
 The distinctive markings were made with hand cut positive masks. I printed a copy of the photo from M113 in Action and reduced it to exact 1/35 scale on a photo copier. Of course I did this at work while looking over my shoulder all the while to make sure my boss didn't see me doing personal copies on the government copier. This gave me a template for the markings in the exact size I needed them as well as a guide for proper placement. After painting the proper areas white I cut positive masks from the printed photo and placed them where they needed to go. Then I was ready to paint the main color.
 I don't want to start a debat on the "correct" shade of Israeli Khaki or Sinai Gray for armored vehicles here. Suffice it to say that no matter what a vehicle's original factory color, whether its Panzer Gray, Olive Drab #31 or Dunkelgelb, service in the field quickly changes that color. So, I mixed the base color with Tamiya XF-57 Buff and XF-49 Khaki. I was planning on a dark wash later so I left the base color and post shading pretty light. I added chipping with a light gray artist’s pencil and followed this with a heavy wash of Grumbacher oil paint thinned with turpenoid. This gave the vehicle a nice three dimensional feel and darkened the base color. Once this was dry I gave the whole thing a selective dusting with ground pastels.
 The stowage gear is from the spares box. Tarps are made from facial tissue and the small ration boxes were printed on cardstock with an inkjet printer. The stretcher was made from Evergreen stock, facial tissue and strips of photo etch brass. The final touch was the driver’s helmet. I hollowed out the head of one of the kit figures with a Dremel tool. It was very tricky to get this done without hollowing out the ends of my fingers too. Luckily I only have a few scars to show for it. I added a photo etch microphone and wire and set it next to the driver’s hatch. The periscope blocks are clear acrylic painted with Tamiya X-25 Clear Green.


 So there you have it. What I thought would be a simple conversion project turned into a fairly extensive undertaking. There were lots of details to pay attention to. Even though I incorporated characteristics found in photographs of several different IDF M113s I think I was able to get close to the feeling of the vehicle in the photo that attracted my attention all those years ago.