For years I turned my nose up at 1/48 scale armor. Quarter scale was strictly an
aircraft scale and I was a 1/35 scale purist. At least I was until I went to Iraq. There was no room to really do much building where I was and no time to spend on any lengthy projects. There were lots of small scale kits that had been donated and sent to Morale Welfare and Recreation (MWR) facilities over there so I gave them a shot. I got absolutely hooked. They are much simpler and it's possible to start and finish a project in an afternoon if don't not get too fancy with it. Even though they are simpler, the level of detail is excellent on many of the kits.

This is the Hobby Boss KV1 kit. Hobby Boss has been producing a great line of 1/48 scale armor kits for quite a while. The detail is almost as good as the 1/35 scale kits and they don’t have the pesky die cast hulls like the Tamiya kits.

I built this kit pretty much straight out of the box. The only exceptions were an MV lens in the headlight and K&S wire mesh on the engine intake grilles.

The tank commander figure was pirated from the Tamiya Soviet figure set.

This is the first winter camouflage scheme I’ve tried in a long time. I read up on the hairspray technique and about a dozen other methods and in the end opted for a little more straight forward method. First I sprayed the entire vehicle with a Soviet green (a mixture of Tamiya IJA Green and Flat Green). Then I masked and oversprayed flat white, leaving a few spotty areas and thin areas.

I chipped both the green and white winter camouflage with a soft #9B pencil which worked very well. I followed the chipping with a very thin wash of black and burnt umber artist’s oils and turpentine. This also served to soften the pencil paint chips a little. If I had chips overdone in any area it was easy to scrub them out with the wash.

I crated the mud with powdered pastel pigments and mineral turpentine and placed it around the running gear and tracks. The pastels are regular stick pastels that I powered on sandpaper and collected in a clear film canister. Two 98 cent sticks give me more pigment than I will need for many projects. The nice thing about the low cost is that I can fill several containers with many different shades and custom mix the colors and tones that I need.

To apply the “pigments” (it’s really just powdered pastel chalk remember) I set the model on its side or end and carefully dribbled and spread the dry chalk where it needed to be. Then, I carefully added turpentine by loading a brush with the solvent and lightly touching it to the powder. Capillary action took the liquid through the powder mix and set it in place. If I needed to adjust the placement I could push and nudge the “mud” how it needed to go with the brush.

All of the washes gave the kit a little bit of a sheen so the whole shebang got a heavy coat of Testors Dullcote. This also helps keep the pastel mud in place as well. The treads were given a light go over with the same #9B pencil I used for the chipping as well as a silver artist’s pencil to simulate wear.

 Finally finished the AFV Club M5A1. Loved the kit. Went together very well though AFV Club has a habit of leaving ejector pin marks in very annoying places like the inside of hatches that are a pain to remove. I also added MV lenses, a scratchbuilt hedgerow cutter and AFV Club individual link tracks (why these aren't included in the kit is a mystery to me) which had sink marks in the face of each and every track link. Ouch. Lots of sanding. Decals are stock. Weathering was post shading, washes and pastels. Very light chipping was done with a #9B aritst's pencil. The periscopes are detailed with exposed 35mm photo film.

 The cotton machine gun ammo belt on the M1919 is cigarette rolling paper crimped over the outside ribbing on a Tamiya paint lid. I threw it on there for the heck of it to see how it would look. Still not sure if it works.
 I added the Verlinden interior and PE which was ok, but nothing to write home about.

 Stowage is facial tissue, cheesecloth and a Tamiya ration box. The aircraft panel marker is lead foil, as are the tool tiedown straps.
 The mud was a first time experiment and I was plesantly surprised with the outcome. It's ground pastel chalk and laquer thinner. I mixed some static grass in the built up mud in on the hull.

 The tie downs are resin replacements from Tiger Models. There are a LOT of tie downs and I think they add a lot. I put exposed 35mm film into the periscope blocks and MV lenses in the headlights and IR lamps. I also cut out and raised the cover on the receiver of the left hand M60. The tie downs on the tarp, jerry cans and the cyclone fence are lead foil.


 The interior is based on period photos, conjecture and how we loaded them in Iraq. The sad thing is for all the time I spent on the interior you can't see half the work. I spent an entire evening making cans for one of the boxes up by the commander's cupola and you can't see one of them.
 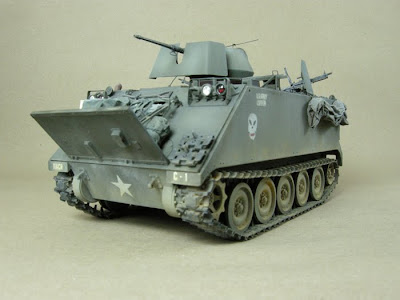 Weathering was done with post shading, washes and pastels, pretty much in that order. The star on the glacics and the rear ramp are Archer dry transfers.
 The cockpit in particular was very nice. The kit comes with a single piece canopy. It would have been a sin to cover up all that beautiful Czechoslovakian metal so I cut the canopy hood out and set the front and back pieces and placed the center section of Falcon
 The kit went together nicely and was very straight forward. I painted it with
 I chipped the paint around the traffic areas on the wing, leading edges and around access panels with a silver artist’s pencil.
 I used black oil mixed with burnt umber thinned with turpentine took care of recessed and panel lines. After giving it a few days to dry thoroughly I used pastel pigments on the highlights.

 Like I said, Joe loved that tank....
 Nice detail shot of the inside of the side doors.
 Another shot of the side door interior. There's also a good view of the rear view port and one of the 75mm ammo containers with .45 cal ammo drums for the Thompson stowed on top.
 A closer shot of the rear view port and ammo stowage. That's the turret basket behind Bogey.
 Some views of the cramped fighting compartment from the right side door. That's the breech of the 75mm main gun on the right and the turret basket on the left.
  The radio man's position. Note the two bow mounted M1919 light machine guns. At least one of these were usually removed in M3s that deployed to North Africa.
 The driver's position.
 A very nice shot of the interior of the drivers view port.
 A few shots of the early vertical volute spring suspension and the T 51 rubber block tracks.
 Note how well used and torn up the rubber block tracks are.
 This shot shows the contours of the turret and commander's cupola, a considerable problem with the Academy kit. Also note how the direct vision block covers are open.

